We use cookies to make your experience better. To comply with the new e-Privacy directive, we need to ask for your consent to set the cookies. Learn more.
FormLabs Documentation
Quick Start Guide (Form 3)
This article applies to Form 3
Follow this guide to begin setting up your Form 3. Learn about the printer’s components, preparing the printer for use, and initial setup steps.
Warning:
Read and understand the manual and safety instructions before using the Form 3.
Printer components
- Resin Cartridge
- Status Ligh
- Cover
- Build Platform
- Resin Tank
- Touchscreen
- Status Light
- Leveling Disc

Unlock
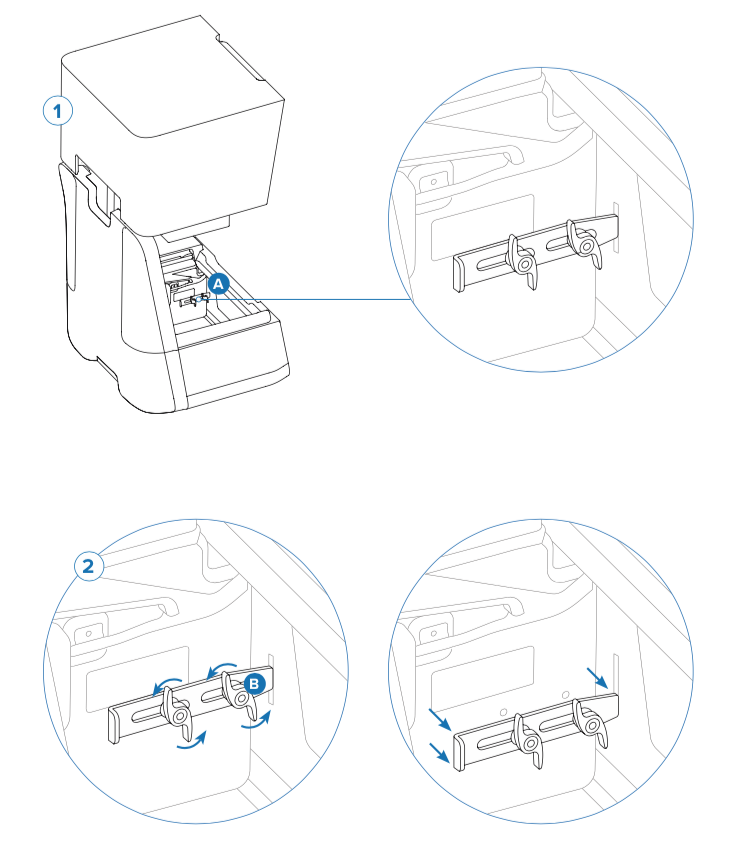
A latch secures the Light Processing Unit (LPU) within the printer during shipping. To release the LPU housing from its shipping position:
- Locate the latch (A) on the LPU housing.
- Loosen and remove the thumb screws (B) and LPU latch.
- Store the thumb screws and latch with the original packaging. The LPU must be secured with the thumb screws and latch during any printer transportation.
Notice:
Release the latch before connecting the printer to power.
Power on

Set up

Follow the prompts on the touchscreen to complete the setup procedure, then visit formlabs.com/setup to download PreForm to your computer and start printing. Contact Formlabs Support or your authorized reseller for additional product support.
Published date:24-Jun-2019.
Receiving and unboxing your Form 3
This article applies to Form 3
Know what to expect when your Form 3 comes in the mail. Unboxing, setup, and package contents are all detailed here.
Form 3 packages
The standard Form 3 bundle ships with multiple boxes: Resin Cartridge(s), Printer, Finish Kit, Resin Tank(s), and Build Platform(s). The Resin Tank, Build Platform, and additional accessory boxes ship separately from the Form 3 printer packaging.
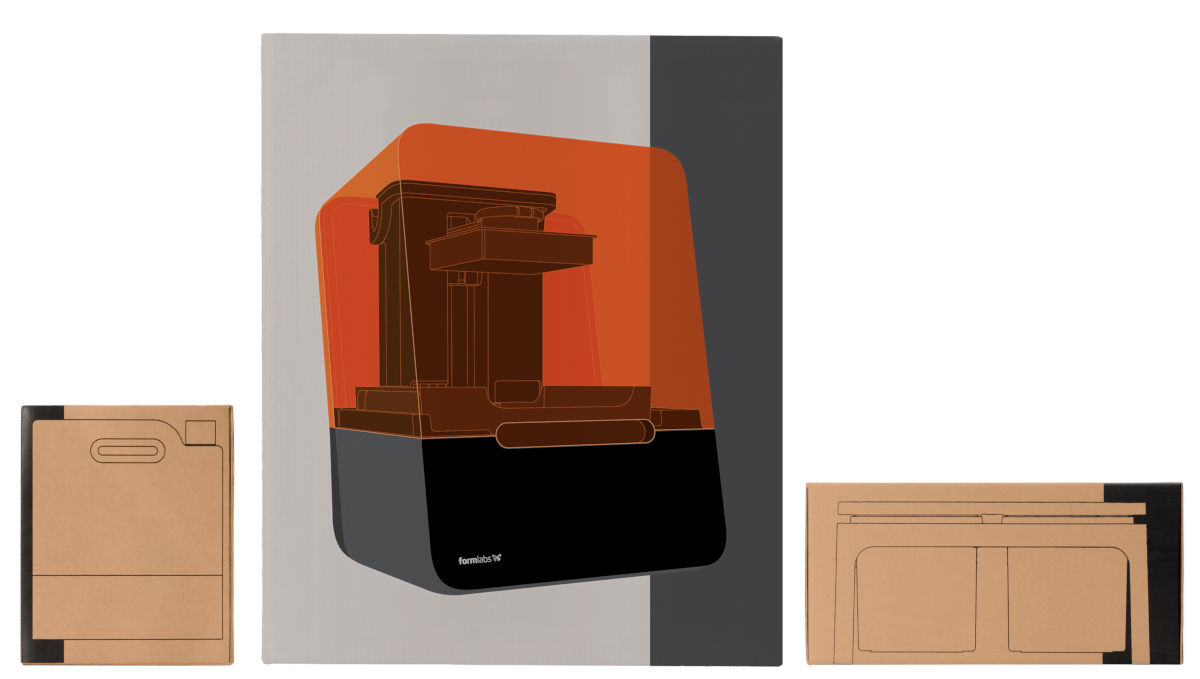
From left, the three standard shipment boxes: Resin Cartridge, Printer, and Finish Kit.
Packaged shipments have the following dimensions and weights:
| Form 3 Printer | Form 3 Finish | Resin Cartridge | Form 3 Resin Tank | Form 3 Build Platform | |
|---|---|---|---|---|---|
| Dimensions | 22.5 × 20 × 27 in (57 × 51 × 69 cm) |
8 × 8 × 9 in (46 × 23 × 23 cm) |
9.5 × 8 × 3 in (24 × 20 × 8 cm) |
14 × 11.8 × 3.3 in (35 × 30 × 8 cm) |
7 × 6.75 × 3 in (18 × 17 × 8 cm) |
| Weight | 50 lb (22.7 kg) |
6.6 lb (3 kg) |
3.3 lb (1.5 kg) |
3.1 lb (1.4 kg) |
1.5 lb (0.67 kg) |
| Contents | Form 3 printer | See Finish Kits | Single cartridge | Single resin tank | Single build platform |
Note: The printer’s power cord and USB cable are included on top of the foam inside the Form 3 box.
Before receiving your Form 3
Prepare a space to receive your Form 3 printer and house the necessary accessories and consumables.
- Choose a stable, level workspace for your Form 3. Reserve the following minimum dimensions for the most convenient access: 16 in (41 cm) width, 21 in (53 cm) depth, 31 in (79 cm) height. Reserve additional space nearby for the Finish Kit.
- Download and install PreForm software.
- Purchase additional supplies:
- Paper towels
- Isopropyl alcohol (90% or higher)
- Prepare a clean, dry space out of direct sunlight to store resin cartridges and resin tanks.
Isopropyl alcohol is the recommended solution for rinsing parts and cleaning liquid resin after each completed print. Keep paper towels in stock to ensure a clean work environment for printing and finishing.
Unboxing your Form 3
The custom packaging your Form 3 arrives in is specially designed to protect the printer during shipping.
Tip:
Save the Form 3's packaging for transporting your printer. Original packaging is required for warranty service.
- Open the box from the top. If the box has a side gate, fold down the side of the box.
- Remove the foam packaging insert and review the accessories, Quick Start Guide, and safety information.
- Use the provided handles to lift your printer out of the box.
- Remove the printer from the carrier tray and set the printer in its workspace.
- Remove any additional wrapping and packaging from the outside of the printer.
- Open the printer cover.
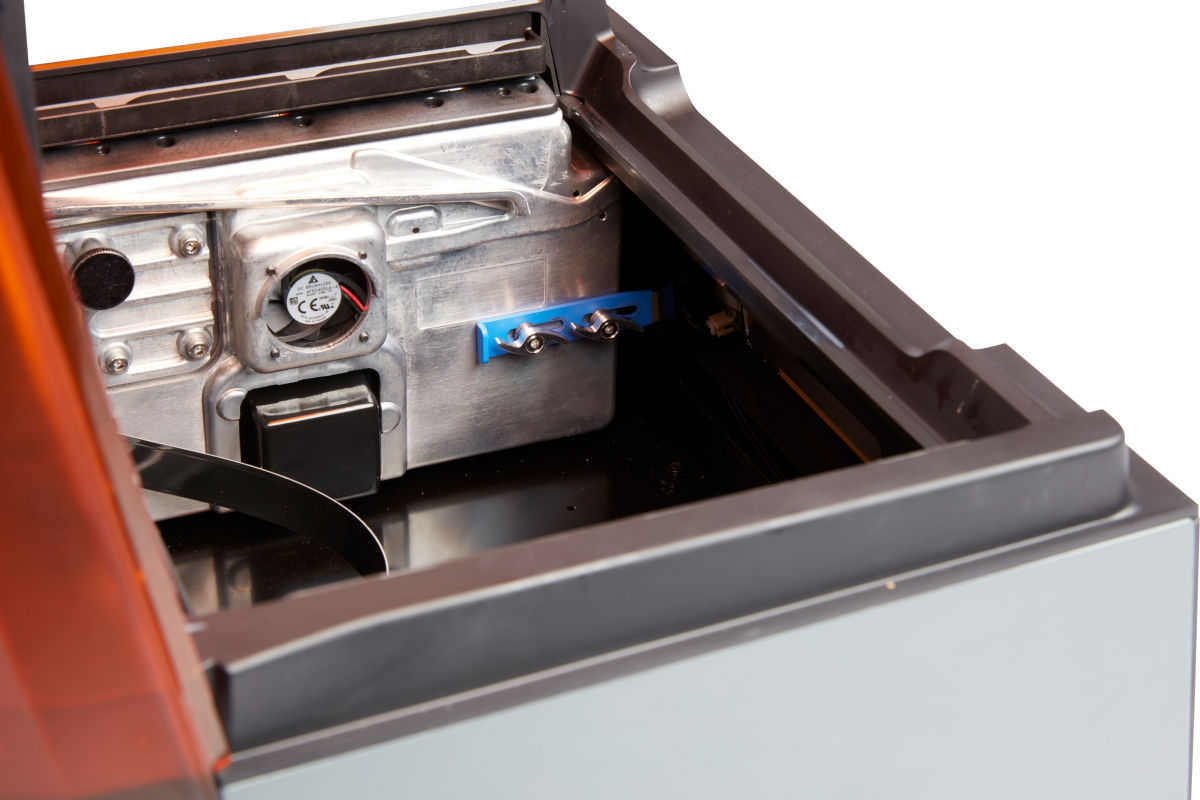
- The Form 3 has a latch that holds the optics module (known as the Light Processing Unit, or LPU) in place during shipping. The LPU housing is inside the printer cavity, on the right side of the printer. Look inside the printer cavity to locate the shipping latch on the left side of the LPU housing.
- Read and remove the instructional sticker wrapped around the LPU housing.
- Loosen and remove the two thumb screws and the latch. Save the latch and screws along with the original printer packaging.
- Plug the included power cable into your printer and connect to a power outlet. The Form 3 turns on automatically.

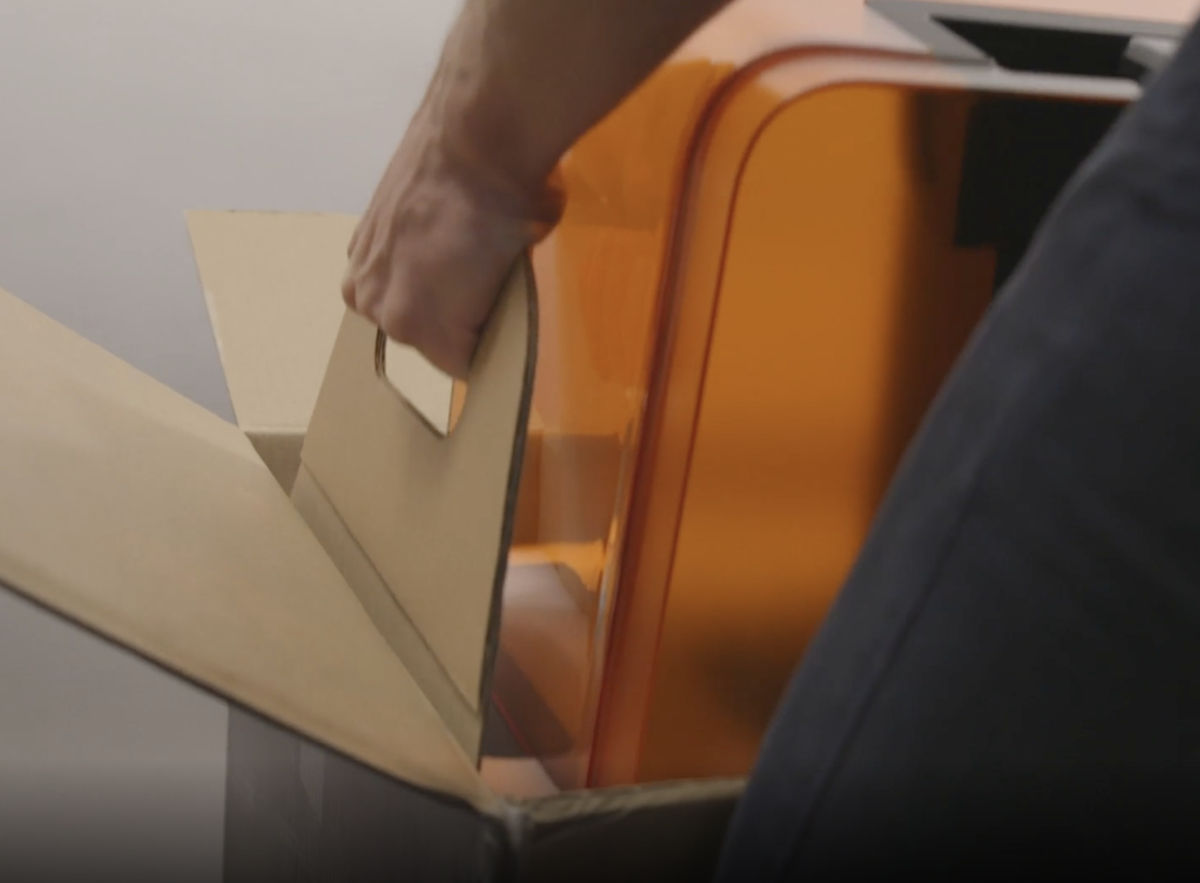
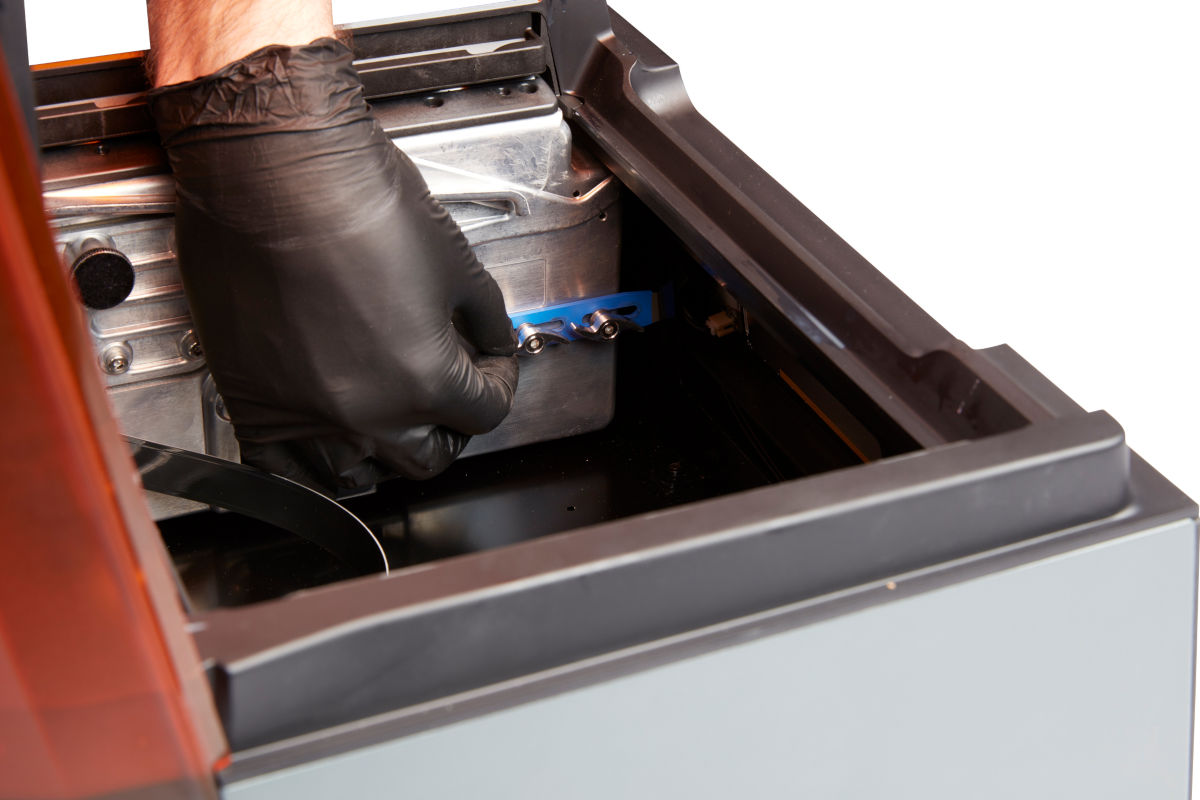
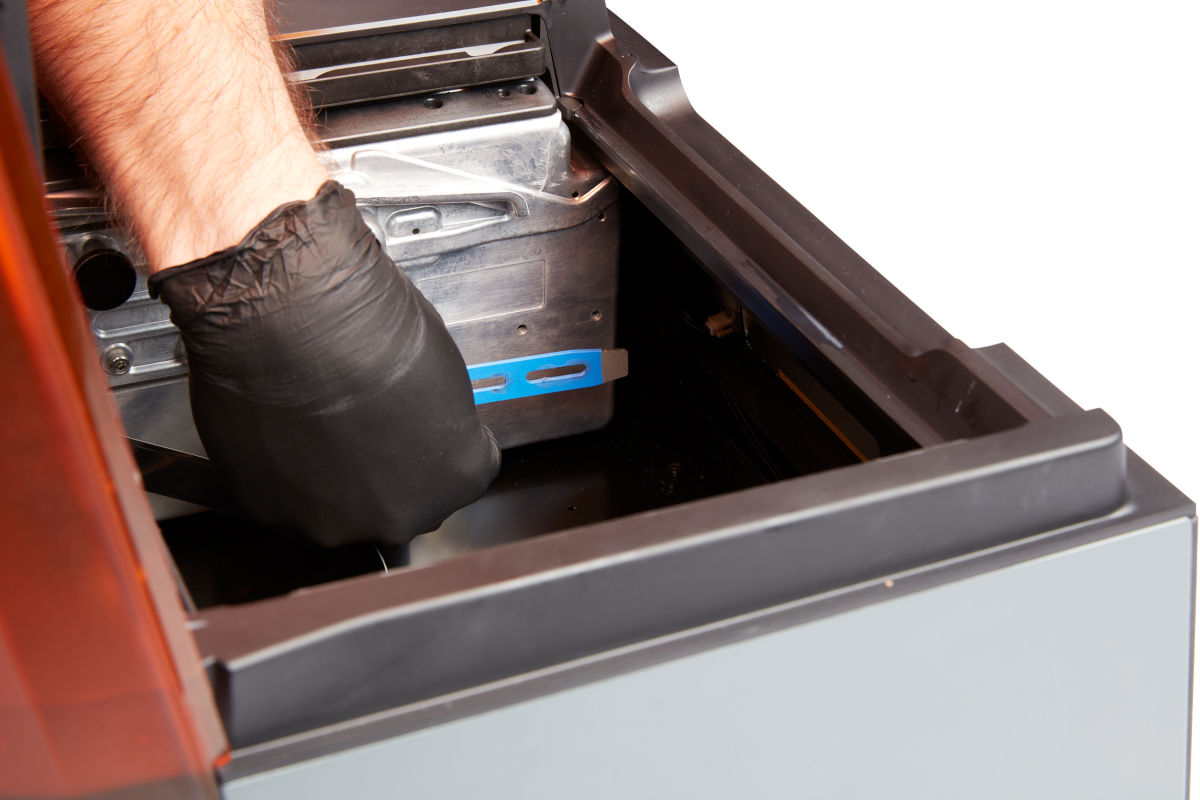

Proceed to follow the onboarding guide on the printer’s touchscreen. Once you’re done, set up the Finish Kit and connect to your printer if you have not already done so.
Serial name
All Formlabs machines have a serial name instead of a serial number. The serial name is a unique identifier used to track the history of manufacturing, sales, and repair, and to distinguish between printers when multiple are connected to a network. The serial name is on the back panel of the machine in the format “AdjectiveAnimal”.
For a Form 3, the serial name is also available on the touchscreen display. To access the serial name from the touchscreen display, press the printer icon on the primary home screen to access the “Your Printer” menu. The serial name is listed in the top-right corner.
Published date:18-Jul-2019.
Setting up your Form 3
This article applies to Form 3
Get ready to print with the Form 3. Learn best practices to set up and use the Form 3 and its Resin Tank, Build Platform, and resin dispensing system.
Unlocking the Light Processing Unit (LPU)
Notice:
Release the latch before connecting the printer to power.
A latch secures the Light Processing Unit (LPU) within the printer during shipping. To release the LPU housing from its shipping position:
- Locate the latch (A) on the LPU housing.
- Loosen and remove the thumbscrews (B) and LPU latch.
- Store the thumb screws and latch with the original packaging. The LPU must be secured with the thumb screws and latch during any printer transportation.


Powering the printer on
Connect the power cord to the printer and a power supply.

The first time the printer is connected to power, it will display a series of onboarding steps on the touchscreen. The onboarding steps include instructions for inserting consumables (resin tank, resin cartridge, and build platform) into the Form 3, additional details for which are given below. Follow these steps to prepare the Form 3 for use.
Inserting the resin tank
Warning:
Resin may cause skin irritation or an allergic skin reaction. Wear gloves when handling liquid resin or resin-coated surfaces. Wash skin with plenty of soap and water.
The resin tank is the primary container for holding resin after it is dispensed from the cartridge. Resin is cured onto the build platform when the laser passes through the tank's bottom film. To insert the resin tank:
- Lift the printer’s cover and remove the resin tank from its case.
- Align the resin tank side walls with the left and right tank carrier rails. The front and rear walls of the resin tank should hang over the ends of the rails and the tank’s resin fill spout should fit into the corresponding hole in the Z tower. The tank is not locked into place in this position but should sit flat and level.
- Holding the side handles on the tank, gently push the tank down and forward
until it locks into the rails and is flush against the back of the printer. You should not need to
apply significant force. The printer will not properly detect the tank unless the tank is fully
inserted.
- If the printer is powered on, it will display a message on the touchscreen and play a notification sound once it detects the tank. The status light on the top of the printer and the logo on the front of the printer will also flash to show that a tank has been detected.


Inserting the mixer
Each resin tank includes a mixer that improves print consistency by clearing the build area and circulating the resin. Scrapers on the top and bottom of the mixer clear the build platform and film, respectively. To insert the mixer:
- Orient the mixer with the flexure arms facing upward and toward the float case on the left side of the tank. The magnets in the mixer should be facing down.
- Slide the mixer to the left, into the float case, until the flexure arms on each end click into place.


Inserting the build platform
The build platform is the surface that each part prints onto. To insert the build platform:
- Lift the build platform carriage handle.
- Align the build platform with the build platform carriage and push into place.
- Lock the handle down to secure the build platform.
Preparing the resin cartridge
The resin cartridge stores resin to be dispensed into the resin tank. To prepare the resin cartridge:
- Shake the resin cartridge to ensure the resin is well-mixed.
- Shake the resin cartridge approximately every two weeks to keep the formula well-mixed for the best print quality.
- Remove the protective valve cover from the underside of the cartridge.
- Consider saving the cover to protect the valve during storage.
Notice:
Do not remove the rubber valve at the bottom of the cartridge. This bite valve controls the release of the resin. Removing the rubber bite valve would allow resin to continuously flow and cause extreme damage to the machine. This damage is not covered by the warranty.

Inserting the resin cartridge
To insert the resin cartridge:
- Align the cartridge with the opening at the back of the printer.
- Push down on the cartridge handle until the top of the cartridge is level
with the back shell of the printer.
- If the printer is powered on, it will display a message on the touchscreen and play a notification sound once it detects the cartridge. The status light on the top of the printer and the logo on the front of the printer will also flash to show that a cartridge has been detected.
- Press open the vent cap before starting a print so that the resin tank fills correctly.


Tip:
Make sure the material in the resin tank always matches the resin type in the installed cartridge.
Printing with the Form 3
Now that the printer is set up:
- Download PreForm and learn how to use the software to prepare your models.
- Learn how to upload your prepared model and start the print.
- Learn how to post-process the part once the print is complete.
Published date:24-Jun-2019.
Connecting to your printer
This article applies to Form 3
Connect your computer to your Formlabs SLA printer to upload and manage prints over Wi-Fi, USB, and Ethernet. Learn how to set-up and manage connections to the printer.
Before beginning, make sure you have set up your printer and installed PreForm on your computer.
Formlabs SLA printers, starting with the Form 3, can connect directly to a computer with the included USB cable. For remote uploading and monitoring, the printers support both wired (Ethernet) and wireless (Wi-Fi) connections; PreForm print preparation software must be connected to the same local-area network (LAN) as the printer in order to send a print job. For a Windows operating system, after installing PreForm, check to ensure that Bonjour is properly installed; this is required to connect over Wi-Fi or Ethernet. The USB connection can still be used while the printer is connected to a LAN.
TIP
When the printer is connected to a LAN, its current status and print progress can be monitored with Dashboard.
1. USB
Use the included USB cable for connecting a computer directly to the printer. Plug one end of the USB cable into the back of the printer, and connect the other end to a computer’s USB port.
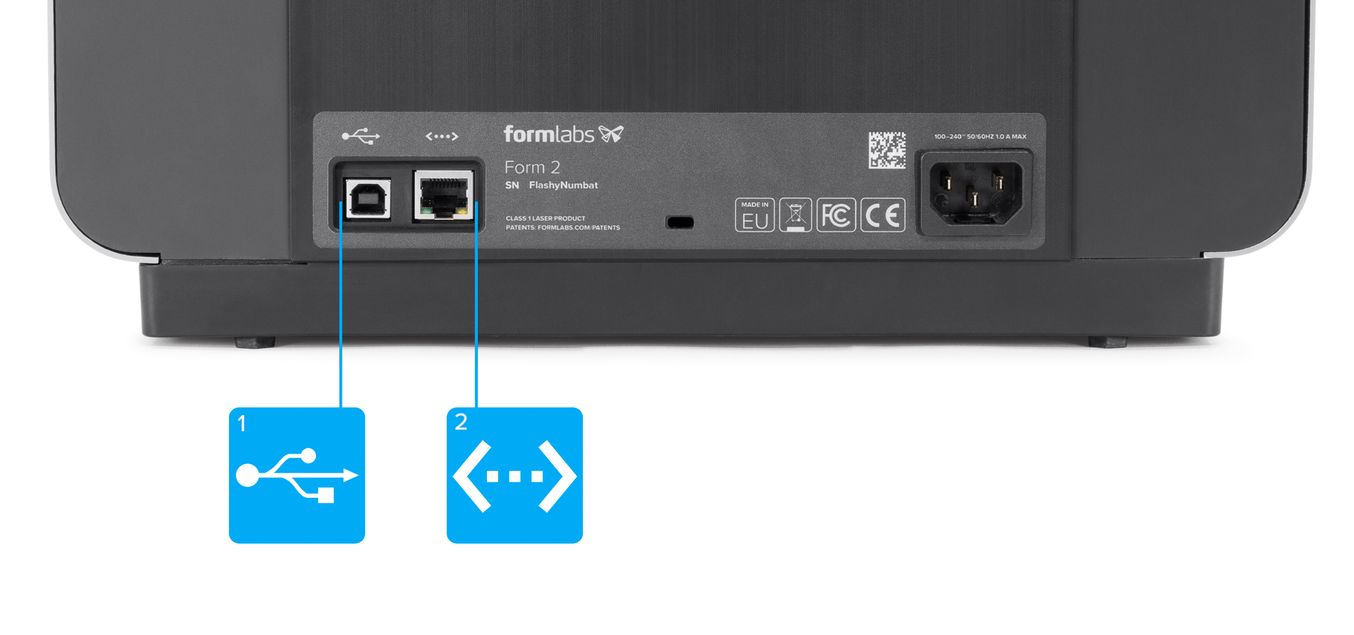
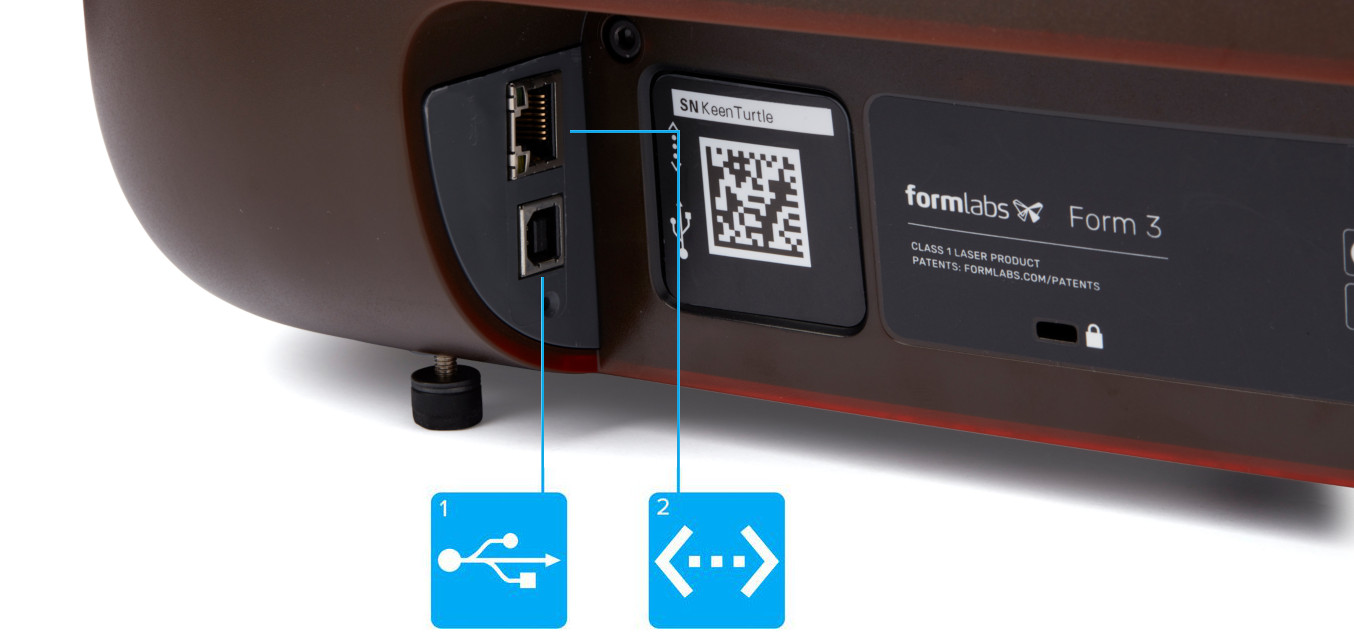
2. Ethernet
The rear of the unit is equipped with a RJ-45 Ethernet LAN Port. Use a shielded CAT-5 Ethernet cable to connect the printer to a local network. Plug one end of the Ethernet cable into the back of the printer, and connect the other end to your LAN.
Form 3
10BASE-T/100BASE-TX/1000BASE-T Ethernet
3. Wi-Fi
The Form 3 printer and later models all have built-in Wi-Fi. Use the printer’s touchscreen to configure a wireless network connection
Connection type: IEEE 802.11 b/g/n Wi-Fi
Frequency: 2.4 GHz / 5 GHz
Security: WPA / WPA2
Manual IP configuration
When connected to an active Ethernet connection or available Wi-Fi network, the printer can be configured with a static IP address
- With an established Ethernet or available Wi-Fi connection, open the printer's “Settings” menu on the touchscreen.
- For Wi-Fi networks, select “Wi-Fi,” then the desired wireless network.
- For Ethernet connections, select “Ethernet”.
- Toggle the “Manual IP” settings to “ON” and input the appropriate “IP Address,” “Subnet Mask,” “Default Gateway,” and “Name Server.” Published date:24-Jun-2019.
Published date:24-Jun-2019.
Leveling the printer
This article applies to Form 3, Form 3
The printer must be completely level before printing can begin.
Connect the printer to a wall outlet to power it on. For the Form 3, press the button on the front panel once to wake the printer if it is in sleep mode. If necessary, the touchscreen will prompt you to level the printer.
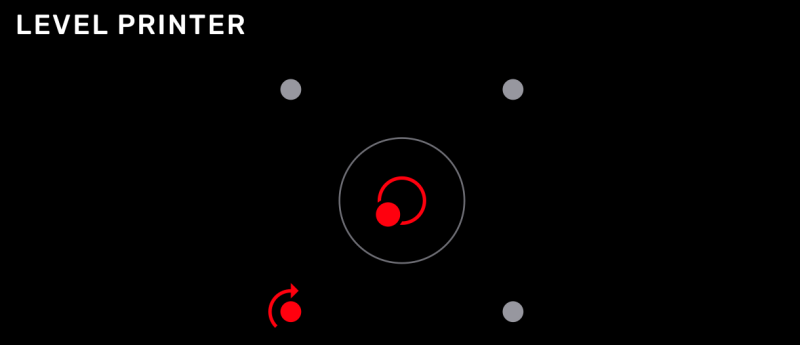
Follow the on-screen instructions to adjust the feet under the printer. With the round leveling tool installed under the designated corner, rotate the tool clockwise to raise and counter-clockwise to lower the height of the printer.
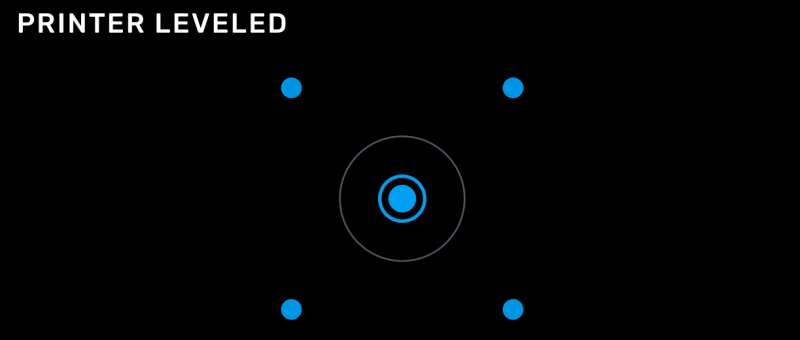
When the screen indicates leveling is complete, proceed with printing.
Published date:24-Jun-2019.
Uploading and confirming a print
This article applies to Form 2, Form 3
Step by step, this article explains how to take a prepared print from PreForm and get it printing on your Formlabs SLA printer.
Uploading
Confirm that the resin type and layer thickness of the FORM file are correct before sending the file to the printer. To start the upload, select the orange printer icon in the PreForm toolbar.
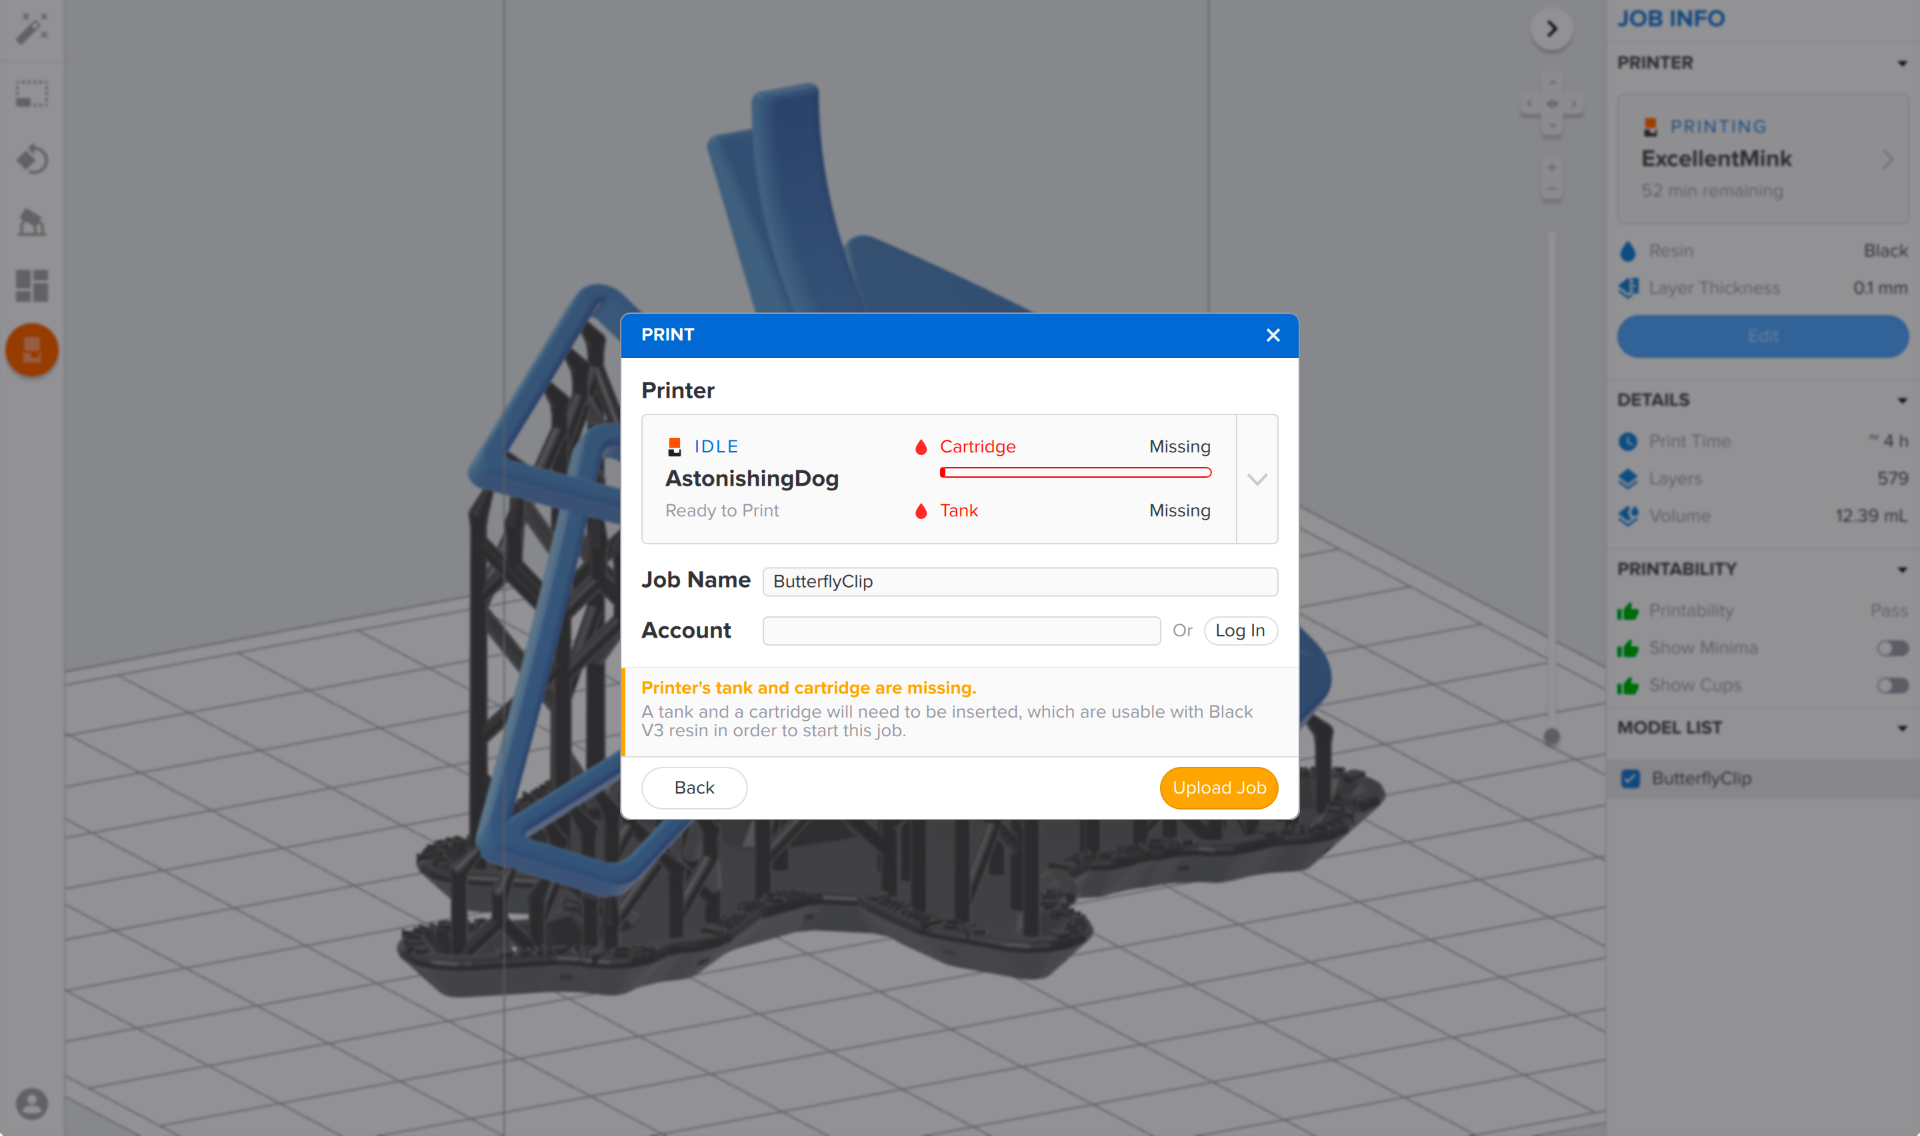
If the orange icon is not available, the printer may not be properly connected to the same network as the computer. Check that you do not have other instances of PreForm open. Save any files in progress, restart PreForm, and reconnect the printer to the network.
Confirming
In the print queue, the printer touchscreen displays the FORM file upload currently in progress. When the upload is complete, select the file name and start the print.
Follow the touchscreen prompts to confirm the resin tank and cartridge in the printer match the file’s settings. The printer automatically fills and heats the resin tank, then starts the print automatically at the appropriate temperature.
TIP
Shake the resin cartridge approximately every two weeks to keep the formula well-mixed for the best print quality.
Managing uploaded prints
The printer saves FORM files in a queue to easily reprint earlier stored print jobs.
Starting a previous print
To start a saved file, confirm the resin tank and cartridge in the printer match the file’s settings. Select the file from the queue to begin the print.
Deleting a print job
To delete a print from the queue, select the file name from the list and then select the delete icon on the touchscreen's bottom left corner.
Managing the printer between prints
Formlabs SLA printers are designed to be left powered on between prints. To turn off the printer completely, disconnect the power cord from the power source.
Published date:24-Jun-2019.
Maintaining resin temperature
This article applies to Form 3
Formlabs SLA printers (starting with the Form 3) heat resin to a set temperature before starting. Learn what temperatures are best, how to use the heating feature, and how to check the resin temperature.
Form 3
The Form 3 has an air intake vent at the rear of the unit. The printer heats the air and blows it across the resin tank to heat the resin. A sensor in the heater duct senses the air temperature.
Open Mode is not currently available for the Form 3.
Pre-heating
The printer automatically heats and maintains a consistent resin temperature before and between print jobs. The following actions trigger the heater:
- Touching the touchscreen
- Opening the cover of the printer
- Uploading a print to the printer
After completing a print, the printer holds the target printing temperature for 30 minutes to allow another print job to start immediately. Heating stops if there is no interaction for 30 minutes.
Print start temperature
The print starts when the temperature reaches the automatic start temperature, which is typically 30–31°C. The automatic start temperature is the lowest target temperature for the best print quality. The resin continues heating to maintain the target printing temperature, typically around 35°C, during printing. Pressing the “Start Now” button starts the print once the printer reaches the minimum start temperature, typically around 20–30°C. Prints started at the minimum start temperature may print successfully but may also experience adherence issues.
Observe the printer's touchscreen while idling or starting a print to determine the resin temperature and heater status.
Checking the resin temperature
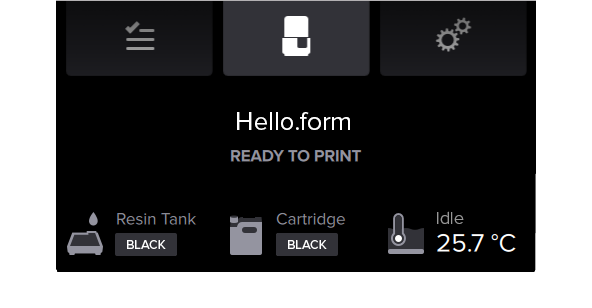
If the printer has not been used recently, heating can take up to 15 minutes. After completing a print, it is normal for the resin tank to be warm. The touchscreen displays the current resin temperature in the “Printer” menu.
Caution:
On the Form 3, the tank carrier can become very hot during printing. Make sure not to touch the tank carrier when removing the resin tank.
Published date:24-Jun-2019.
Resin dispensing system
This article applies to the Form 3
Formlabs SLA printers feature a resin handling system that automates resin dispensing during a print and tracks resin consumption. When a print begins, the printer checks that the resin type in the cartridge and tank match each other and that these consumables match the current print settings. It also ensures that there is enough resin in the tank and cartridge to complete the current print. The result is a printing process that is cleaner, more consistent, and leads to fewer errors than refilling resin tanks manually.
Resin cartridges
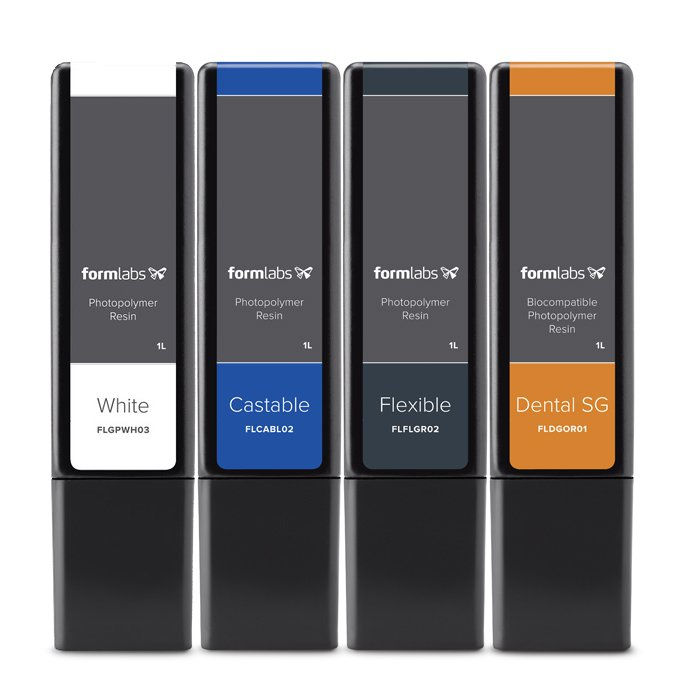
Formlabs resins come in cartridges that allow the printer to track and dispense resin during a print without additional monitoring.
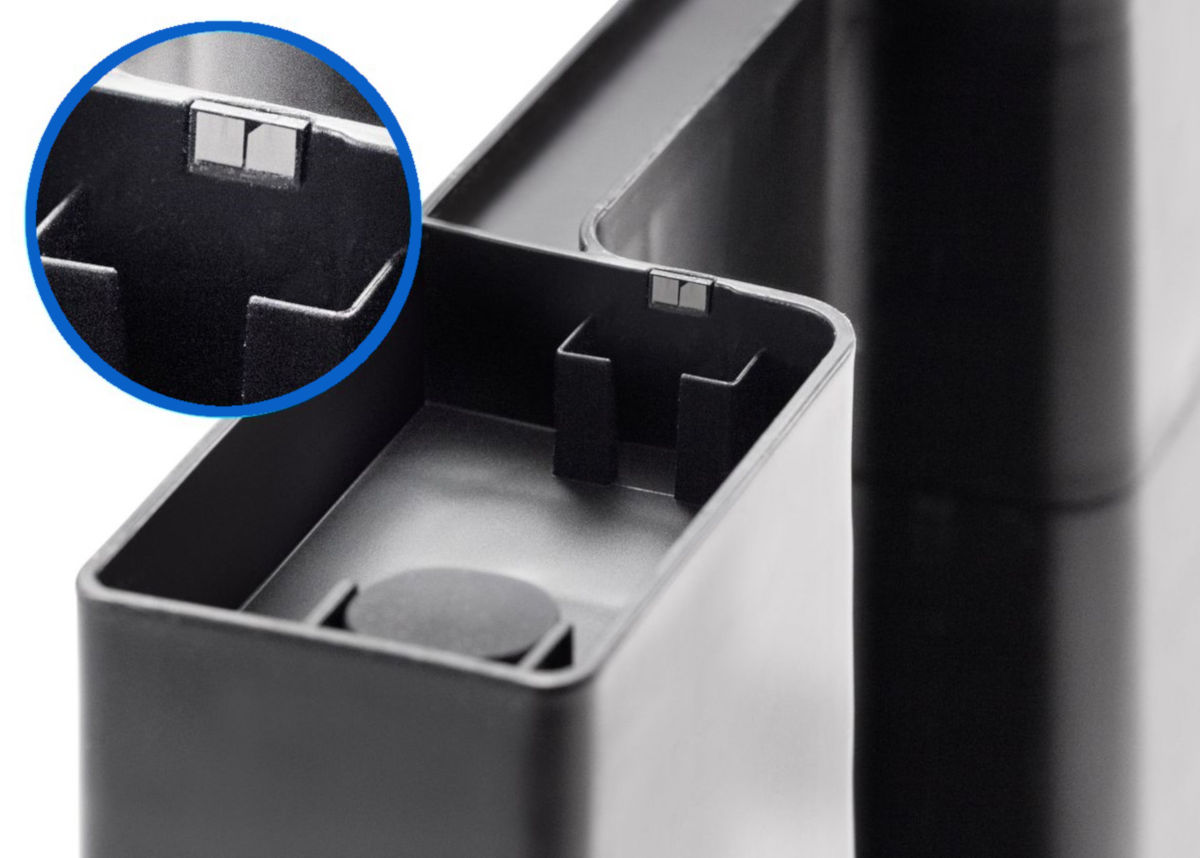
On the bottom of each resin cartridge is an ID chip with two rectangular silver pads. The ID chip is programmed with the resin type for the cartridge. The ID chip also contains information about how much resin remains inside.
When you insert a resin cartridge into a Formlabs SLA printer and start a print, the printer reads the ID chip to check that the resin in the cartridge matches the resin in the tank and the resin type of the FORM file.
When printing, the resin dispensing system writes data to the ID chip as it dispenses resin from the cartridge. This allows any printer that prints with the cartridge to know how much resin is left and whether there is enough to complete the print job.
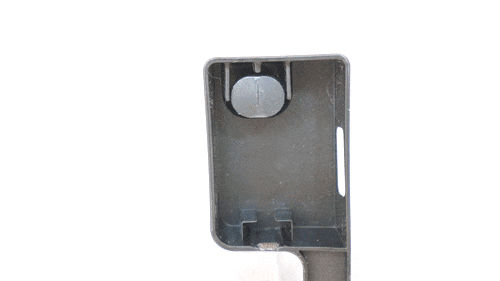
Adjacent to the ID chip is a bite valve. When compressed, the bite valve opens slightly. If the cartridge vent cap at the top of the cartridge is also open, resin flows from the cartridge into the tank.
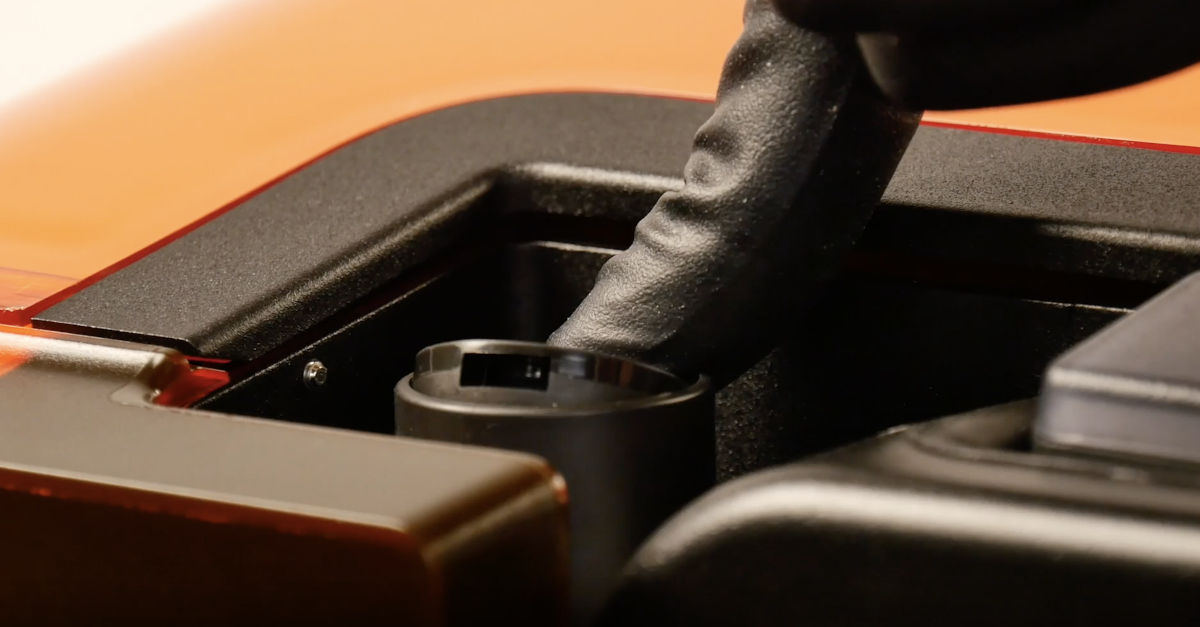
Maintain the ID chip and bite valve to ensure that the cartridge dispenses resin properly throughout its lifetime.
Resin tanks
Resin tanks store resin to be used during a print. Each successive layer of a print uses up some of the resin in the tank. The printer refills the tank with resin dispensed from the resin cartridge.
Like resin cartridges, resin tanks have an ID chip that stores the tank’s resin type (if the tank has been used) and usage history. If the resin tank is new, the printer will program the ID chip with a resin type when the tank is used for the first time.
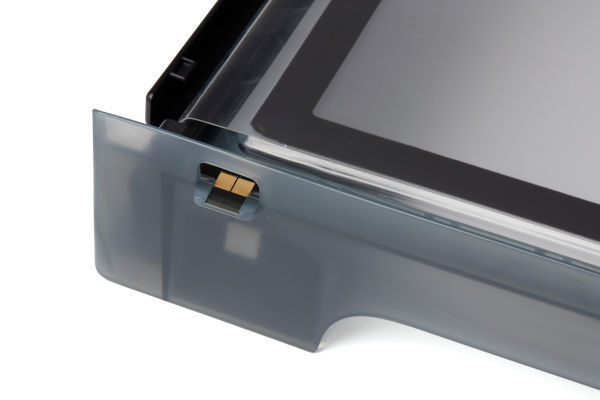
Form 3 resin tank ID chip.
Maintain the ID chip (on the Form 3 standard resin tank, Form 3 Resin Tank LT, or Form 3 resin tank) to ensure that the printer can recognize and interact with the resin tank.
Resin sensing
Formlabs SLA printers have a component known as LevelSense, that measures the amount of resin in the resin tank during a print. By monitoring the resin level, the printer can automatically dispense resin from the cartridge into the tank whenever the resin in the tank begins to run low. As long as the cartridge isn’t empty, the print won’t pause or fail because there isn’t enough resin in the tank.
Form 3
The LevelSense board in the Form 3 is located behind the resin tank, at the back-left of the printer.
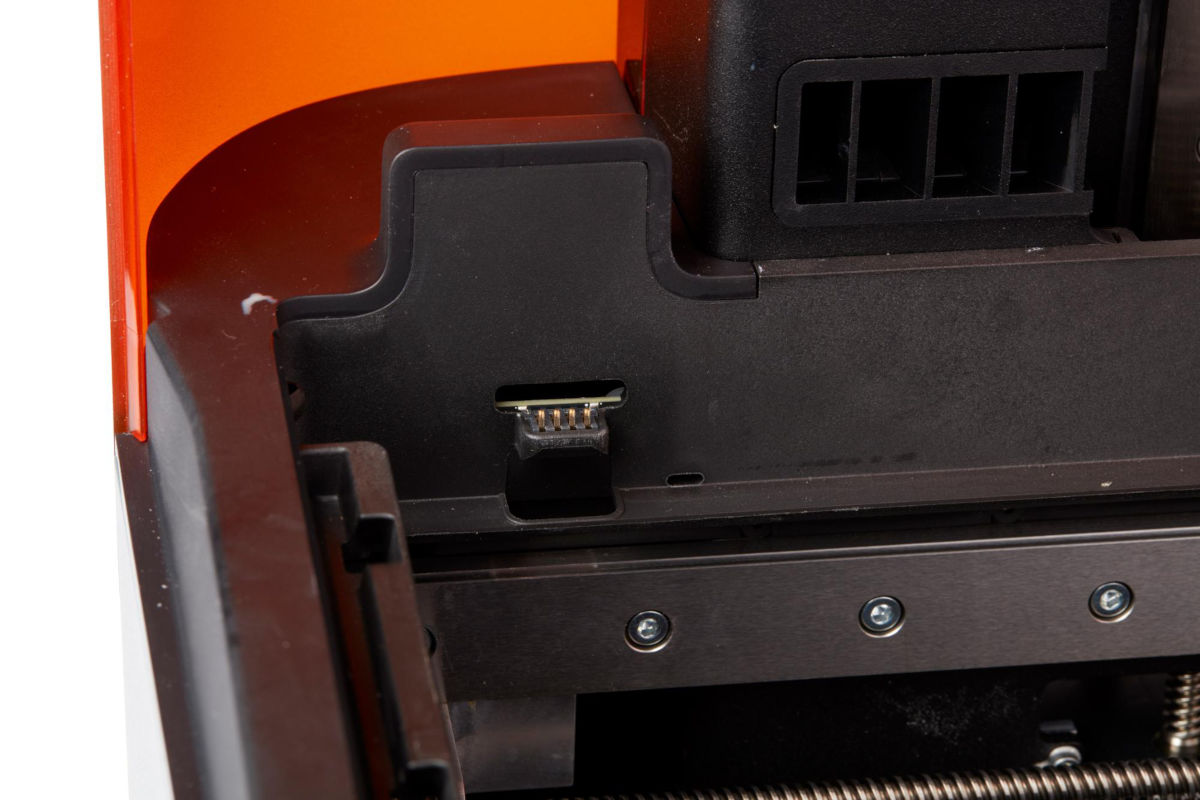
The LevelSense board tracks the height of the float, located in the mixer case on the left side of the resin tank.
Resin dispensing
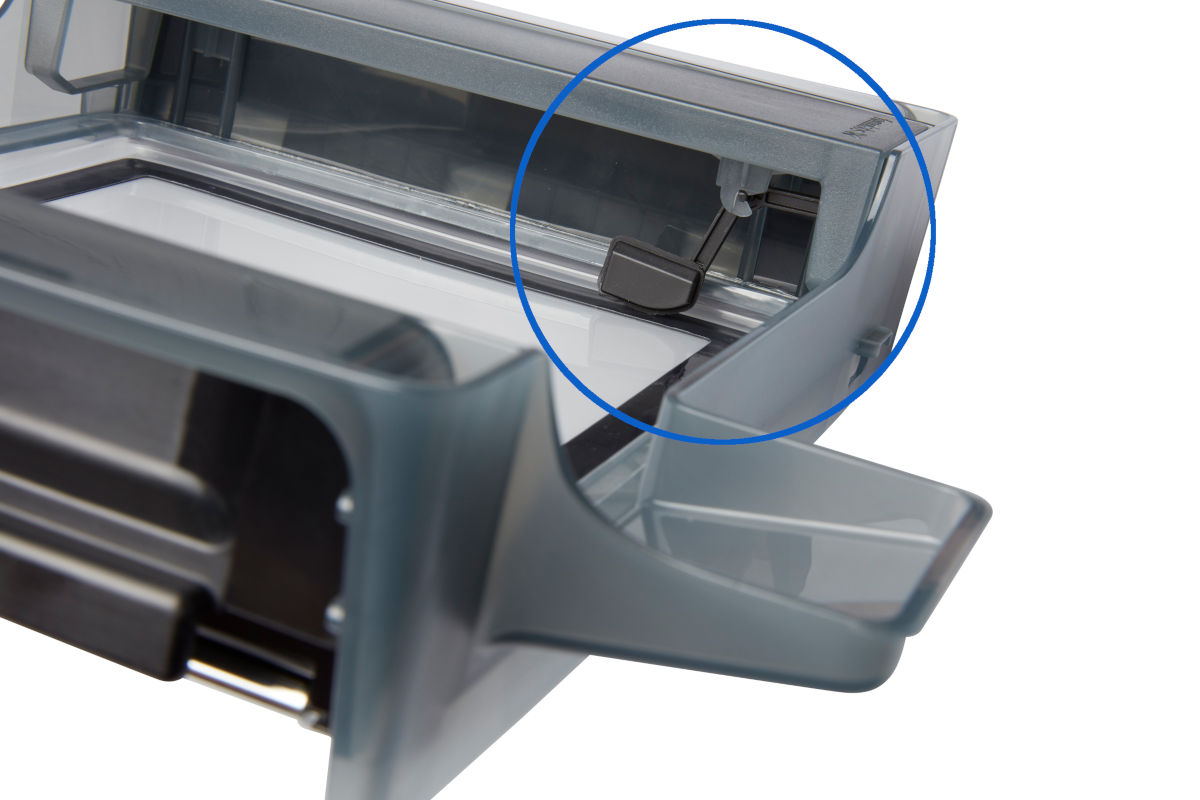
The cartridge floor contains a set of spring fingers that read the cartridge ID chip and a motorized dispense arm attached to a spring.
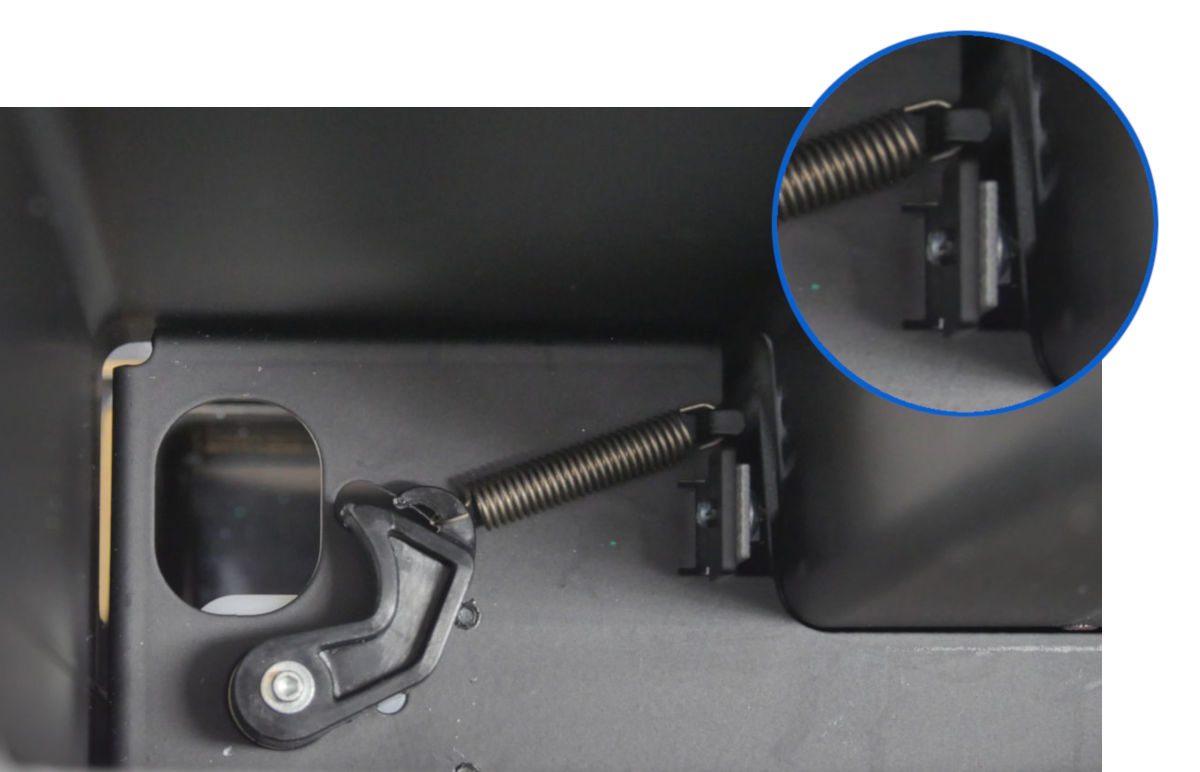
The dispense arm and cartridge floor assembly on the Form 3. Inset: cartridge spring fingers. When the printer, using the LevelSense measurements, determines that the resin tank needs to be refilled, it activates the dispense arm.
The dispense arm, driven by a motor underneath the cartridge floor, squeezes the bite valve on the bottom of the resin cartridge. Once the tank has been refilled, the spring attached to the dispense arm pulls it out of the way so that no resin is dispensed inadvertently.
Published date:20-Aug-2019.
Cleaning the glass optical window (Form 3)
This article applies to Form 3
In the Form 3, the printer optics - the laser diode, mirrors, and other components - are contained in a module called the Light Processing Unit (LPU). The LPU, sitting inside the LPU housing, moves left and right in the printer during each layer of a print. The laser beam exits the LPU through an anti-reflective coated glass optical window mounted on top of the unit. The window preserves print quality and reliability by protecting the LPU components from dust, oil, and resin contamination. Keep the glass optical window clean to ensure successful prints.
The LPU housing, with the LPU, rollers, and optical window, sits in the LPU garage on the right side of the printer when a print is not running. The garage protects the optical window from most forms of contamination, but dust can still accumulate on its surface over time. As the laser passes through the optical window, any such contamination can cause the laser light to diffuse or weaken, resulting in print defects.
Tip:
If you notice dust or contamination on the underside of the optical window or inside the LPU, contact Formlabs Support or your authorized reseller for additional instructions.
Overview
To maintain the glass optical window, inspect the optical window surface for dust, oil, or contamination using a flashlight, LED, or cell phone light. If dust, oil, or contamination is noted, clean the glass surface following Formlabs instructions. As with most optical surfaces, minimal cleaning is the best cleaning.
Tip:
To protect the optical window from dust, keep the Form 3 cover closed when the printer is not in use.
Required supplies
To remove dust:
- Nitrile gloves
- Flashlight, LED, or cell phone light
- Rubber bulb air blower
- PEC*PAD contaminant free wipes
To wet wipe:*
- Nitrile gloves
- Flashlight, LED, or cell phone light
- Rubber bulb air blower
- PEC*PAD contaminant free wipes
- 90% or higher isopropyl alcohol (IPA), non-recycled
* Wet wipe only if necessary after removing dust.
Estimated time: 10 minutes
Removing the consumables
Always remove the build platform, resin cartridge and resin tank before performing maintenance on the printer to avoid dripping resin into the printer cavity.
- Lift the platform lock and remove the build platform.
- Close the resin cartridge vent cap and remove the resin cartridge.
- Remove the resin tank from the printer. Place the resin tank in its case.
- Cover the resin tank case and set it aside with the build platform and resin cartridge on a clean, flat surface.
Inspecting the optical window
Inspect the optical window for dust, oil streaks, fingerprints, or cured resin.
Tip:
For best results, dim or turn off the main lights in the room when inspecting the optical window with a secondary light source. Always wear clean gloves when handling optical surfaces to avoid contamination. Do not touch the rollers next to the optical window to avoid contaminating them.
- With the printer plugged in and powered on, tap the wrench icon on the touchscreen to enter the “Settings” menu, then tap “Calibration,” then tap “LPU Replacement.” The LPU housing moves from its storage position on the right side of the printer into its maintenance position.
- When prompted by the touchscreen, disconnect the power cable before continuing with maintenance.
- Shine a secondary light source (for example, a flashlight, LED or cell phone light) onto the optical window to reveal any hidden contamination on the glass surface.
- Hold the light source at the shallowest angle possible. From the edges of all three accessible sides (that is, left, front, and right), scan the light back and forth across the optical window.

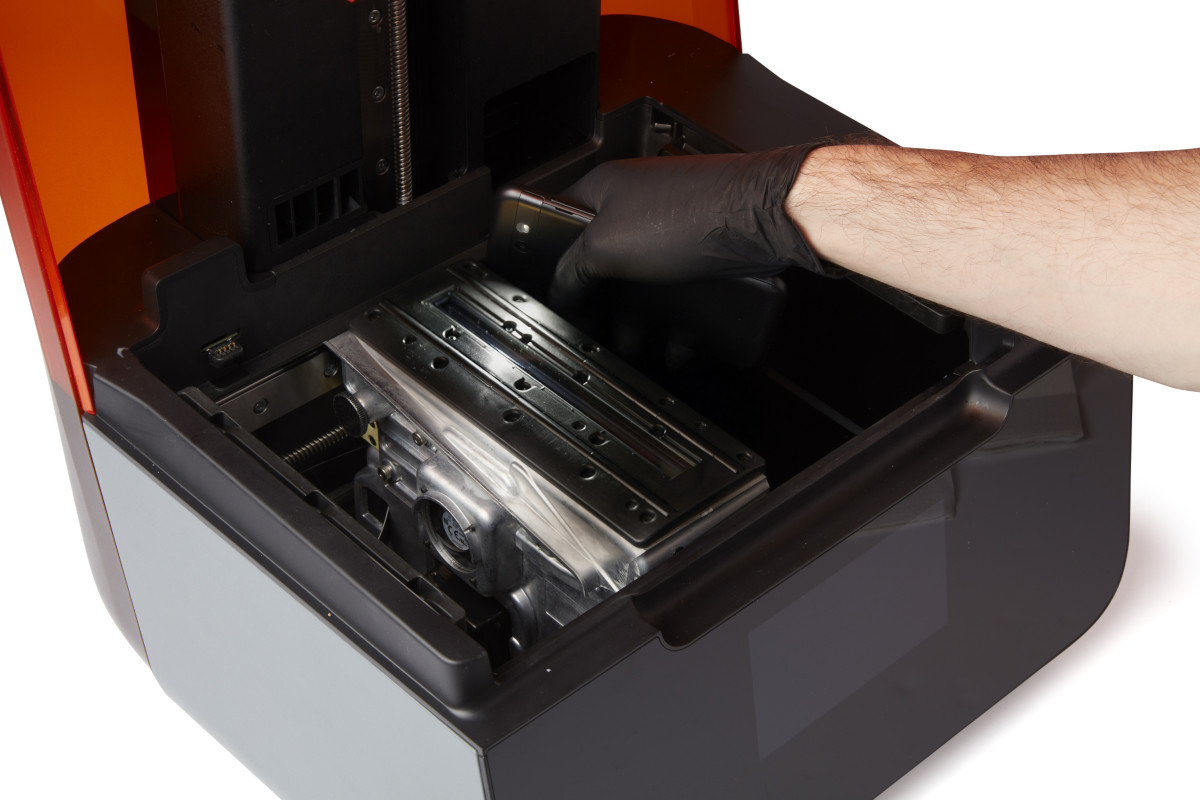
A properly illuminated glass optical window
Removing dust
Remove dust and other loose contaminants, which can interfere with the laser.
Tip:
Avoid using compressed air. If necessary, carefully follow the directions on the canister to avoid depositing propellant onto the glass surface. Propellant contaminates the optical window and can affect print quality.
- Use a rubber bulb air blower to gently remove any visible dust from the optical window.
- Make sure to remove any large particles that may scratch the glass surface.
- If a rubber bulb air blower is not available, compressed air may be used.
- Use a new PEC*PAD to remove any remaining dust from the optical window with a dry wipe.
- Wipe slowly, pulling the PEC*PAD toward you, repeating until you have cleaned the entire glass surface.
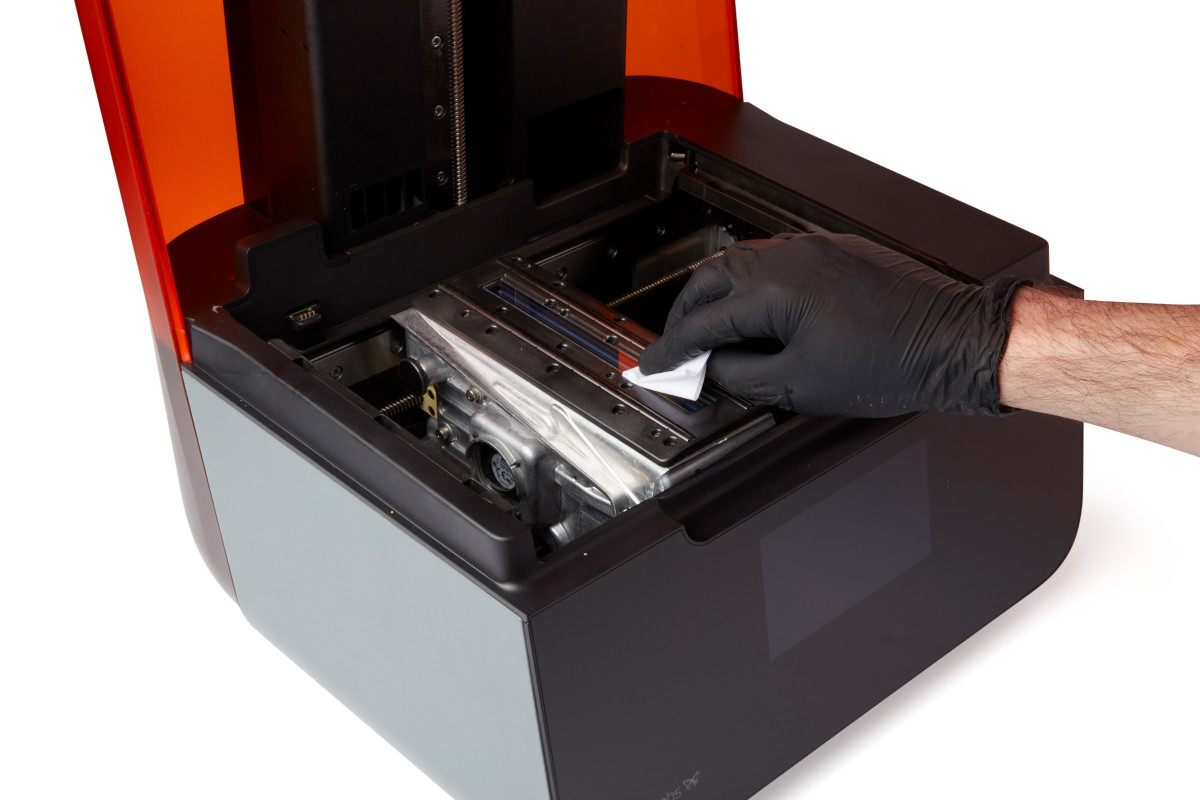
Proceed with a wet wipe only if the dry wipe does not clean the glass completely.
Notice:
Wiping the optical window with non-recommended materials may damage the glass surface and affect print quality.
Cleaning with a wet wipe
Tip:
If resin has dripped onto the window, use a small amount of IPA with a clean microfiber cloth first. Move the cloth slowly to allow the IPA to dissolve the resin. Allow the surface to dry before using additional IPA with PEC*PADs to wipe the glass surface.
Wet wipe the optical window only if oil, smudges, fingerprints, or resin contamination is visible. Only use IPA to clean the glass surface as any other cleaning solution may degrade the anti-reflective coating.
Notice:
Avoid using cleaners or materials that can scratch or leave residue on the anti-reflective glass surface of the optical window.
- Apply a small amount of IPA to a new PEC*PAD.
- Wipe the optical window slowly with the PEC*PAD, pulling the PEC*PAD toward you. Repeat this step until you have cleaned the entire glass surface.
- Use your secondary light source to inspect the optical window. Repeat the wipe if any streaks are visible.
- Multiple passes may be necessary to achieve a streak-free surface. Each PEC*PAD can be used multiple times by refolding the material to expose a fresh surface for each pass on the glass panel.
- Dry wipe the glass surface again with a new PEC*PAD to remove any remaining streaks.
If streaks are difficult to remove, contact Formlabs Support or your authorized reseller. When requesting help, please provide photos of the optical window illuminated by a secondary light source and a list of attempted cleaning steps.
Completing the maintenance
After cleaning the optical window, power on the printer to complete the maintenance process. Close the printer cover and connect the power cable to the printer and the power supply. The printer will initialize and the LPU will move back to its home position to perform a calibration.
Published date:24-Jun-2019.
Safety with Formlabs SLA printers
This article applies to Form 3
Formlabs SLA printers are precision tools that require respect and care to ensure safe operation. Follow all safety considerations listed here during operation.
Throughout the manual and other documentation, safety notices are marked with standard words and symbols. Read the definitions below to understand these markings and how they relate to your safety.
Symbol

Meaning
Danger indicates a hazard with a high level of risk which, if not avoided, will result in death or serious injury.

Warning indicates a hazard with a medium level of risk which, if not avoided, could result in death or serious injury.

Caution indicates a hazard with a low level of risk which, if not avoided, could result in minor or moderate injury.

Notice indicates information considered important, but not hazard-related. Not following this information could void the warranty or result in damage to the machine.

Warning:
The laser beam is harmful to the eyes. Avoid direct contact.

Danger:
Isopropyl alcohol is a flammable chemical.
General usage
Formlabs SLA printers are intended for use as-is for additive manufacturing. Read the printer manual, these safety advisories, and any other relevant documentation to determine if the printer is suitable for your use case.
Warning:
- General usage: You shall independently verify the suitability of additive manufacturing, stereolithography, Formlabs SLA printers, and any specific designs or materials employed for the application and intended purpose before use. In no event shall Formlabs be liable for any loss, death, or bodily injury that you suffer, or that you cause to any third party, in connection with your use of Formlabs products. To the fullest extent legally permitted Formlabs EXPRESSLY DISCLAIMS ANY IMPLIED OR EXPLICIT WARRANTY OF FITNESS for a particular usage, the particular nature and circumstances of said usage being unforeseen and unforeseeable to Formlabs.
- Medical usage: Formlabs is not a manufacturer of medical devices. Formlabs provides tools and materials that may be used in many applications, but makes no claims as to the safety or effectiveness of any specific devices made using Formlabs products. Certain Formlabs products, such as those commonly known in the industry as “biocompatible” resins, have been engineered to comply with relevant industry standards. The specific standards and most relevant technical specifications may be identified within the technical data sheets and have been tested according to relevant testing protocols for those standards and specifications. Biocompatible resins are a speciality product, developed for use by medical professionals, and should be used in accordance with the instructions for use.
- Modification: Do not modify–Formlabs SLA printers are intended for use as-is. Modifying the printer without explicit approval and directions from Formlabs will invalidate your warranty, and could potentially ruin the machine and cause you bodily harm.
- Manual: Read and understand the manual and its safety instructions before using the printer. Failure to do so can result in serious injury or death.
Caution:
- Lifting hazard:The printer may be difficult for a single person to lift and carry. Consider the weight and dimensions of the printer before transport or installation.
- Moving parts:Formlabs SLA printers contain motors and moving parts. Do not open the printer cover until the touchscreen indicates the print is complete. Formlabs SLA printers contain an interlock system to automatically shut off the motors when the orange cover is opened. If this system is tampered with, or fails, there is risk of pinching, crushing, or tangling.
Laser
Formlabs SLA printers are Class 1 laser products, which are eye-safe at all times under normal use. Observe all necessary safety precautions during operation and maintenance to prevent unintended laser radiation exposure.

Laser certification
Form 2
- IEC 60825-1:2007
- EN 60825-1:2007
- FDA performance standards for laser products except for deviations pursuant to Laser Notice No. 50, dated June 24, 2007.
Form 3
- IEC 60825-1:2014
- EN 60825-1:2014
- FDA performance standards for laser products except for deviations pursuant to Laser Notice No. 56, dated May 8, 2019.
Warning:
- Unauthorized maintenance: Class 1 Laser Product (diode: 405nm; max output: 250 mW). Only remove the shells of the printer with authorization from Formlabs or a certified reseller. Disconnect power before removing the shells.
Caution:
- Radiation exposure: Use of controls or adjustments or performance of procedures other than those specified herein may result in hazardous laser radiation exposure (class 3B).
Isopropyl alcohol (IPA)
IPA dissolves liquid resin, making it effective for washing parts printed on Formlabs SLA printers and for cleaning resin spills. Follow all relevant handling, storage, and disposal advisories when working with IPA.

Danger:
- Fire hazard: IPA is flammable. Keep containers closed, and keep out of the reach of children.
Caution:
- Disposal: Refer to the Safety Data Sheet (SDS) and local authorities for guidance on disposing of IPA.
- Skin and respiratory irritant: Wear protective gloves and work in a well-ventilated area when handling IPA.
Resin
Formlabs SLA printers print parts using photoreactive liquid polymer resin. Always consult the Safety Data Sheet (SDS) as the primary source of information to understand safety and handling of Formlabs materials.
Warning:
- Poison hazard: Never ingest resin in liquid or solid form. If swallowed, immediately call a poison center or medical professional. Contact ChemTel with the information below for global 24-hour assistance interpreting the SDS.
- North America: +1 800 255 3924
- Worldwide Intl.: +01 813 248 0585
- Reference Contract Number: MIS4707563
- General safety: Always consult the SDS as the primary source of information to understand safety and handling of Formlabs materials. In an emergency involving resin, always refer to the SDS and/or seek help from a medical professional.
- Skin irritant: Resin may cause skin irritation or an allergic skin reaction. Wear gloves when handling liquid resin or resin-coated surfaces. Wash skin with plenty of soap and water.
Caution:
- Spill hazard (resin tanks): Resin may spill over the tank walls if the resin tank tilts more than 5-10°. Hold the resin tank level with two hands. To inspect and clean the underside of the tank, empty the resin tank and/or take care to avoid spilling resin outside the tank.
- Spill hazard (resin cartridges): Do not remove the rubber valve at the bottom of the cartridge. This bite valve controls the release of the resin. Removing the rubber bite valve allows resin to continuously flow and causes extreme damage to the machine. This damage is not covered by the warranty.
Tools
Formlabs SLA printers come with various part and support removal tools. These tools are sharp and present a cutting hazard if used improperly.
Caution:
- Cutting hazard: Using the included tools (e.g., flush cutters, scrapers, etc.) on slippery surfaces (such as a resin-coated build platform) can result in sudden movement. Orient sharp tools away from yourself, especially when cutting or scraping.
- Risk of eye injury: Some methods of support removal may cause small pieces of supports to break away. Beware of flying debris and consider wearing eye protection and gloves to protect the skin and eyes.
Maintenance
Formlabs SLA printers require regular preventative maintenance and may require occasional repairs. Follow all relevant instructions and safety advisories when performing any maintenance on a printer.
Danger:
- Electric shock hazard: Performing maintenance on the printer while it is plugged in increases the risk of electric shock. Never remove the back panel of the printer while the printer is plugged in.
Warning:
- Supervision: Formlabs provides instructions to advise skilled and non-skilled persons in installing, operating, and maintaining Formlabs SLA printers. The printer shall only be maintained by a qualified and trained person.
- Modification: Do not open Formlabs SLA printers and/or investigate internal components unless under the guidance of Formlabs or an authorized reseller. Contact Formlabs or an authorized reseller for any additional guidance. All steps that involve opening a printer and/ or investigating internal components should be done by skilled persons under the guidance of Formlabs or a certified distributor.
- Unauthorized maintenance: Unauthorized disassembly or repair procedures may damage the printer and void the warranty.
- Personal protective equiment: Wear personal protective equipment when performing maintenance tasks. Use tools only as described.
- Moving parts: Disconnect the power cable before maintenance. Moving parts and lead screws present crushing and tangling hazards.
Radio interference
Notice:
This equipment has been tested and found to comply with the limits for a Class B digital device, pursuant to CFR Title 47, Part 15 of FCC Rules. These limits are designed to provide reasonable protection against harmful interference when the equipment is operated in a commercial environment. This equipment generates, uses, and can radiate radio frequency energy and, if not installed and used in accordance with the instruction manual, may cause harmful interference to radio communications. Operation of this equipment in a residential area is likely to cause harmful interference in which case the user will be required to correct the interference at their own expense.
Published date:24-Jun-2019.
Supporting a model
This article applies to Form 3 Software
Support structures reinforce overhangs and other weak areas. They should be removed after the print is complete.
TIP:
Open several files to work on multiple projects in the same job.
Understanding the support structure
Supports consist of three components: rafts, scaffolding, and touchpoints. The raft forms a base that adheres to the build platform. Scaffolding stems from the raft to secure your part as it prints. Touchpoints are areas of contact where scaffolding and the print meet.
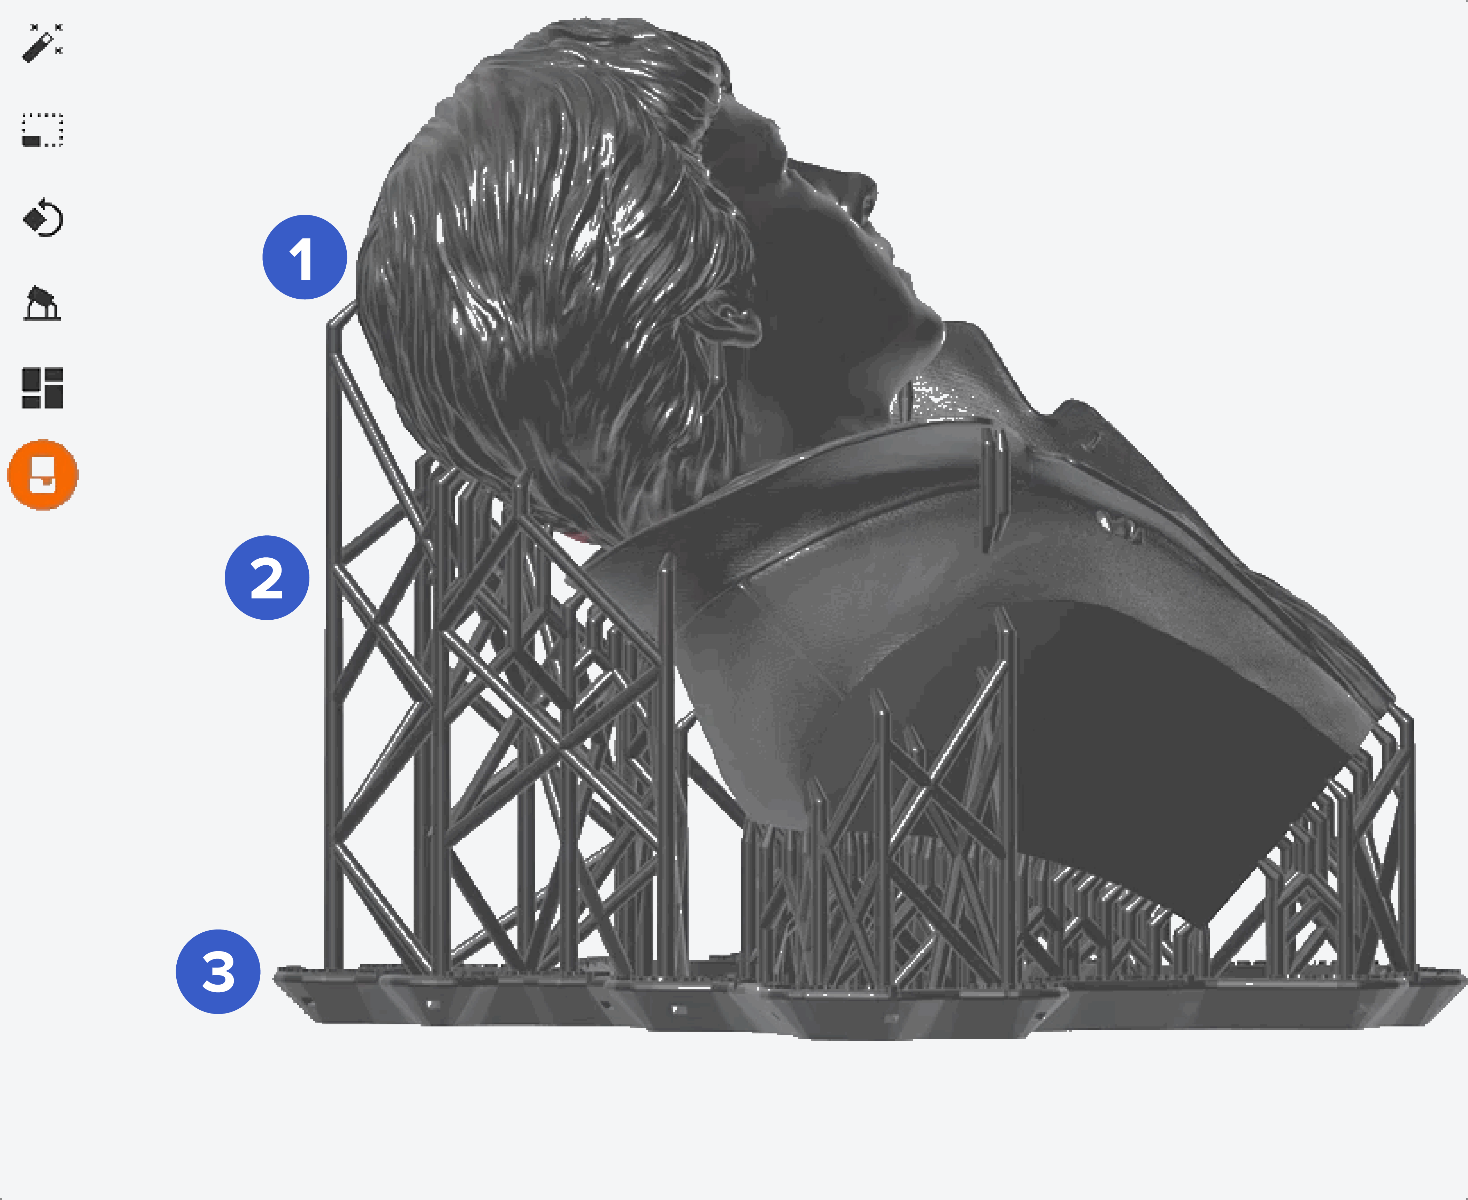
Support structures include: (1) touchpoints, (2) scaffolding, and a (3) raft.
Supporting overhangs
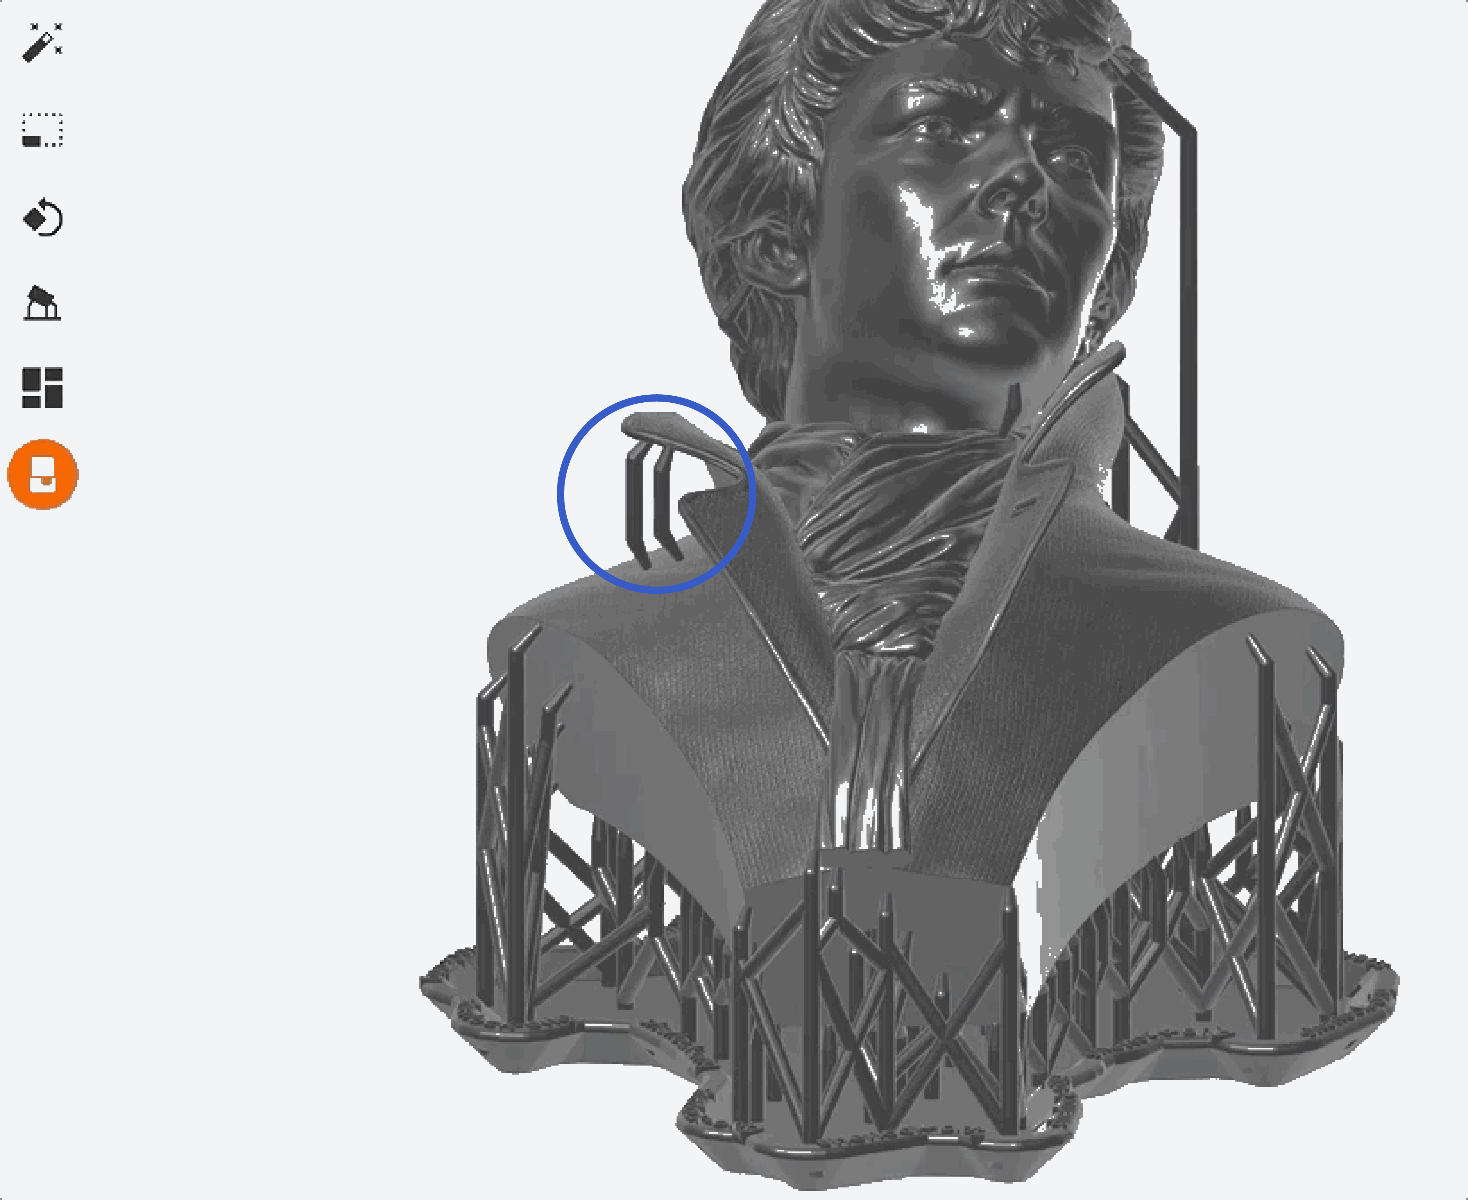
Simple shapes can be printed directly on the platform without supports. But features extending away from the main body can create overhangs that need to be propped up. Without proper support, these features can warp or completely fall away from the main body of the print.
Slice through a model to inspect each layer for overhangs to support.
TIP:
Areas in need of support are highlighted in red on your model.
Printing directly on the build platform
Reduce post-processing work by printing directly on the build platform.
- Select the model in PreForm. Manipulators are overlaid on the model.
- Click Orientation. A dialog box opens.
- Click Select Base…. The pointer becomes an orange arrow.
- Click on a flat surface of the model to become the base. The model reorients.
- Click Done. The window closes.
- Click Supports. A dialog box opens.
- Click Raft Type. A dropdown appears.
- Select None. The dropdown disappears.
- Click Auto-Generate Selected. The model sits directly on the build platform.
TIP:
Choose a flat surface to face toward the build platform and act as a base.
NOTE:
Early layers experience Z-compression and may shorten your print by up to a millimeter. Maintain dimensional accuracy by adjusting Z-Compression Correction.
Choosing to print without a raft doesn’t mean you have to print without supports. To add supports to a model that is already directly on the build platform:
- Select the model in PreForm. Manipulators are overlaid on the model.
- Click Supports. A dialog box opens.
- Click Auto-Generate Selected. Supports are added to the selected model.
TIP:
Select the Internal Supports option for additional stability while printing.
Considerations for printing directly on the build platform:
- Choose a flat surface of the model to function as a base: When printing directly on the build platform, choose a flat surface of the model to function as a base during printing. Ensure that the chosen flat region of the model has a surface area sufficient to resist the suction forces experienced by the part during the printer’s peel process. Experiment with different flat surfaces of each model to determine the best area to function as a base.
- Vertical compression and Z-axis dimensional accuracy: Formlabs printers compress the first several layers of every print to ensure adhesion to the build platform. This compression shrinks the vertical height of a print’s early layers. When printing with a PreForm-generated raft and supports, the compression does not affect the part’s dimensional accuracy because the compression only affects the generated raft and supports. When printing a model directly on the build platform, expect each model to be approximately 0.5 mm shorter than designed along the Z-axis in its first layers. The exact compressed height varies between printers and build platforms.
- Early layer unioning: PreForm automatically revises the first 0.75 mm of all on-build-platform prints to increase adhesion. “Early layer unioning” combines and extrudes the shapes—the perimeter and fill area—of all layers contained in the first 0.75 mm to ensure that printed parts have a completely flat surface in contact with the build platform. Slide the Slicer through the early layers to view the uniform, combined geometry.
- Model compatibility: The “On Build Platform” feature works best for model geometries with at least one flat surface that can face directly parallel to the build platform. Shapes without any flat areas, such as spheres or organic shapes, are not recommended for the “On Build Platform” feature because these geometries will print with slightly flattened base layers due to early layer unioning and compression.
- Part removal: Take special care when removing parts printed with “On Build Platform", especially when there are no printed features for the removal tool to easily separate the part from the build platform. The flush cutters may chip the part. Separate the part from the build platform at the face that is least critical for the part's application or aesthetics.
Supporting models
Supports can be auto-generated or added manually. Adding more supports increases the likelihood of print success, but also increases the amount of post-processing work.
- Open models in PreForm.
- Click Supports. A dialog box opens.
- Click Auto-Generate All. Supports are added to all models on the build platform.
If some parts of a model are highlighted in red as undersupported, add individual supports:
- Select the model in PreForm. Manipulators are overlaid on the model.
- Click Supports. A dialog box opens.
- Click Edit…. The model turns gray and supports are shown as white touchpoints.
- Click on the undersupported areas in red to add a support. White touchpoints appear where clicked.
- Click Apply. Supports are regenerated and remaining undersupported areas are highlighted in red.
- Repeat until model is fully supported.
Saving changes
After supporting your model for maximum printability, save your work as a FORM file.
- In the menu bar, click File > Save As…. A window opens.
- Choose where to save the file.
- Name the file.
- In the Save as type field, select PreForm Jobs (*.form).
- Click Save. Your support structure is saved as a FORM file.
Published date:12-Sep-2019.
Designing a printable model
This article applies to Form 1+, Form 2, Form 3, Software
Design directly influences how parts print. Understanding how a model fits within the build volume and what features require support prepares digital models for the physical constraints of the 3D printing process.
TIP:
Review>design specifications before designing a model in your preferred 3D design package.
Applying supports
Supports are the foundation for accurate printing. As a part prints, it is exposed to peel forces that can warp or dislodge unsupported areas. So while it may be tempting to print without them, supports provide necessary integrity.

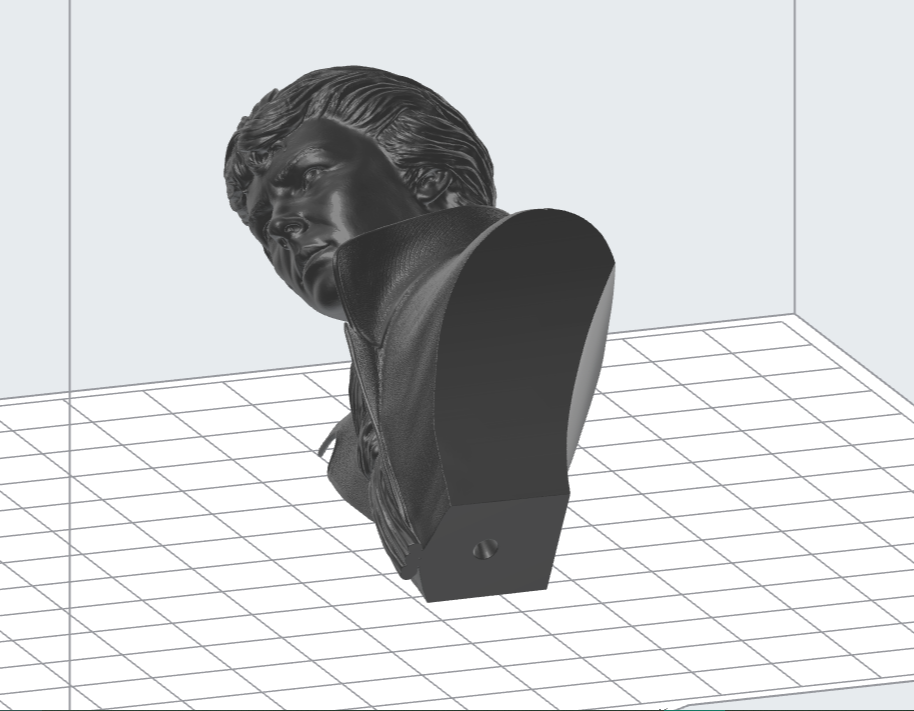
Printing hollow models
Printing a model as a hollow object conserves resin and decreases print time, but it also presents a challenge. A fully enclosed cavity, such as a hollow sphere, traps and contains air while printing. The >suction cup jams the printer’s motors and prevents the build platform from raising to continue to the next layer. By designing a drainage hole into a hollow model, air can escape.
TIP:
A drainage hole with a minimum diameter of 3.5 mm is recommended.
Applying internal supports
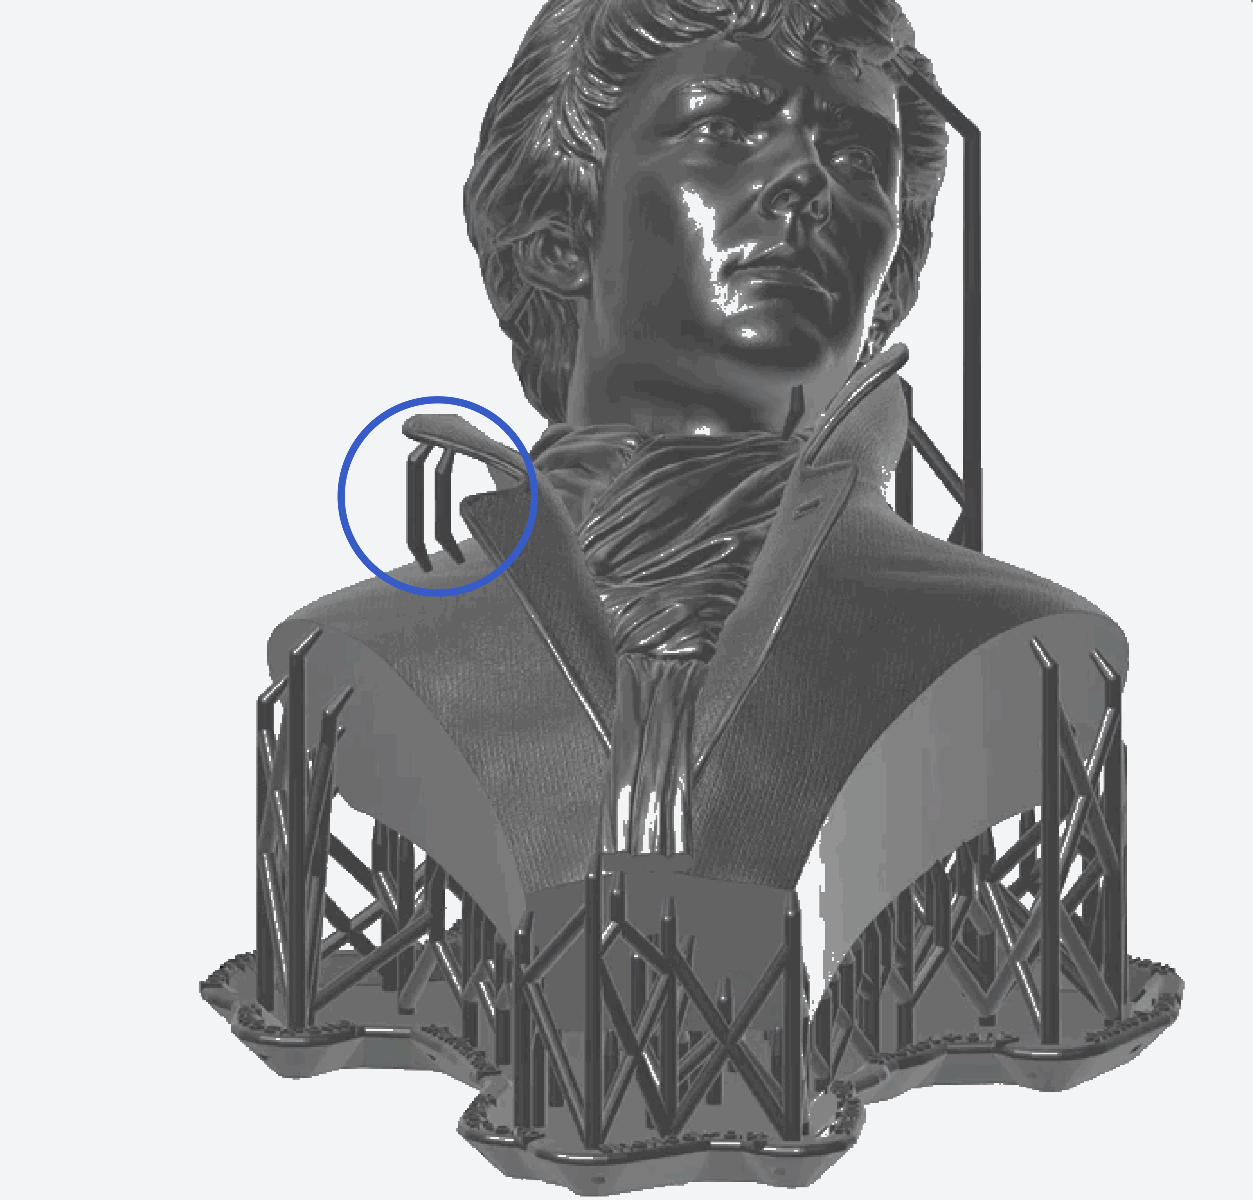
Internal Supports are any supports with both ends touching the model, instead of one end connecting to the raft. PreForm generates these supports for features that hang over other parts of the model.
TIP:
PreForm automatically generates Internal Supports by default.
Considering print volume
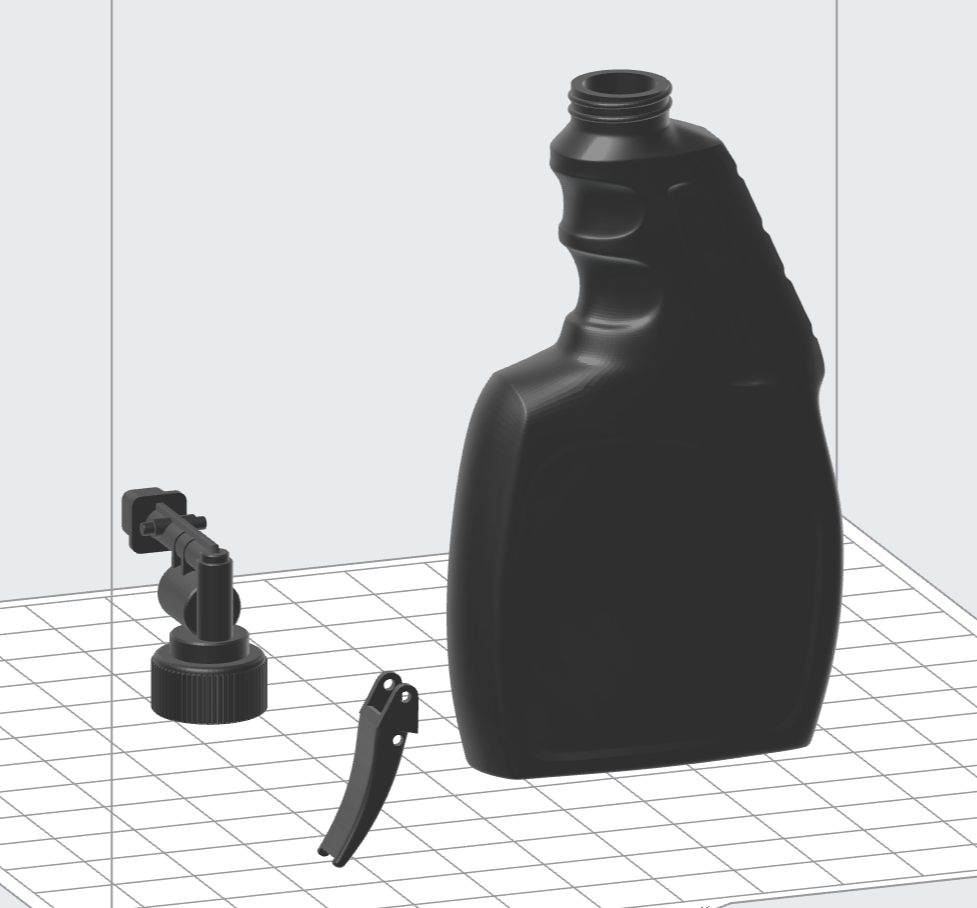
The maximum build volume for Formlabs printers are:
- 4.9 × 4.9 × 6.5 in (125 × 125 × 165 mm) for the Form 1+.
- 5.7 × 5.7 × 6.9 in (145 × 145 × 175 mm) for the Form 2.
- 5.7 × 5.7 × 7.3 in (145 × 145 × 185 mm) for the Form 3.
TIP:
Larger parts can be resized within PreForm. To maintain dimensional accuracy, consider designing them in multiple sections that can be assembled after printing.
Saving with single body settings
Each model should be saved as a single body in your preferred 3D design package. If your final model is the combination of multiple sub-models, try saving each piece as its own individual body. Otherwise, there may be irregularities in the print if the intersecting layers of the sub-models are not correctly recognized by PreForm.
TIP:
If PreForm detects that a file is not saved as a single body, then the Broken Models Detected window appears. Click Repair to merge the multiple sub-models into a single body, or click Ignore to open the file as is.
Published date:25-Jul-2019.


